
AI Authority
Unlock the power of AI to transform your video content creation process with our comprehensive playbook, '▶️ Create Video Content with AI | Prompt Playbook'.
Start Readingproducing video content from our long form written content
or getting started with freelance work to bridge to building a business
And for the first time ever we had a dead tie. Totally split down the middle.
So!
We’ll do both.
Not both this week. Not even I’m that mad.
But instead I’m going to cover video content production this week and then freelancing next week. Capiche?
Let’s go.
This week is:
Part 1: Creating Video Scripts
Part 2: Recording High-Quality Video
Part 3: Rapid video editing
Part 4: Multi-Purposing Content
Part 5: Publishing and Promoting Video
You’ve probably heard of all the benefits of doing video as part of your content marketing.
In short:
Personable - Videos help you connect with viewers by humanising your brand. They get to “know” you much more than if you only use text.
Opens up new channels - some platforms are highly skewed towards video or only support video content. By ignoring video you are cutting off access to Audience members.
Increased understanding - Video is able to demonstrate concepts and ideas more clearly. Viewers retain more information from video.
Higher engagement - Videos lead to more shares and comments across social media. Viewers are more likely to interact with video.
Improved SEO - Videos improve dwell time on webpages and Google favours video in search results. I’ll talk about how we combine videos to your blog to supercharge SEO.
Accessible learning - People can consume videos easily on their own time. Video caters to different learning styles than text only. And, using AI we can prepare subtitles in any language. We can now even overdub to deliver the spoken content in those languages too.
I won’t belabour the point. Video is great and you should be doing it.
For most people the block isn’t why but how - they are scared to get on camera, hate how they look/sound or find they need to spend hours editing out every um and err.
I’m going to show you how to get past all of that in the next two Parts. Basically showing you how to use AI to record and edit videos to automatically remove all your errors.
In this Part though we’re talking about what content we’ll be producing. Where the information comes from and how we prepare scripts.
The first source of video content should be our long form written content.
Specifically:
newsletters
blog articles
X threads
X long form posts
LinkedIn articles
etc.
Any longer form piece of content where you go into detail and show your expertise.
For me my primary written content is, perhaps unsurprisingly, this newsletter. It’s the source for everything else I produce online.
Think about all the longer form content you produce and test some of it with this repurposing prompt:
Act as a expert content marketer script writer

Convert this written long form piece into a video outline

Do not include inserts, only text script

[copy/paste long form content]
For this example I used a piece about using common enemies in content marketing. The original piece can be found here.
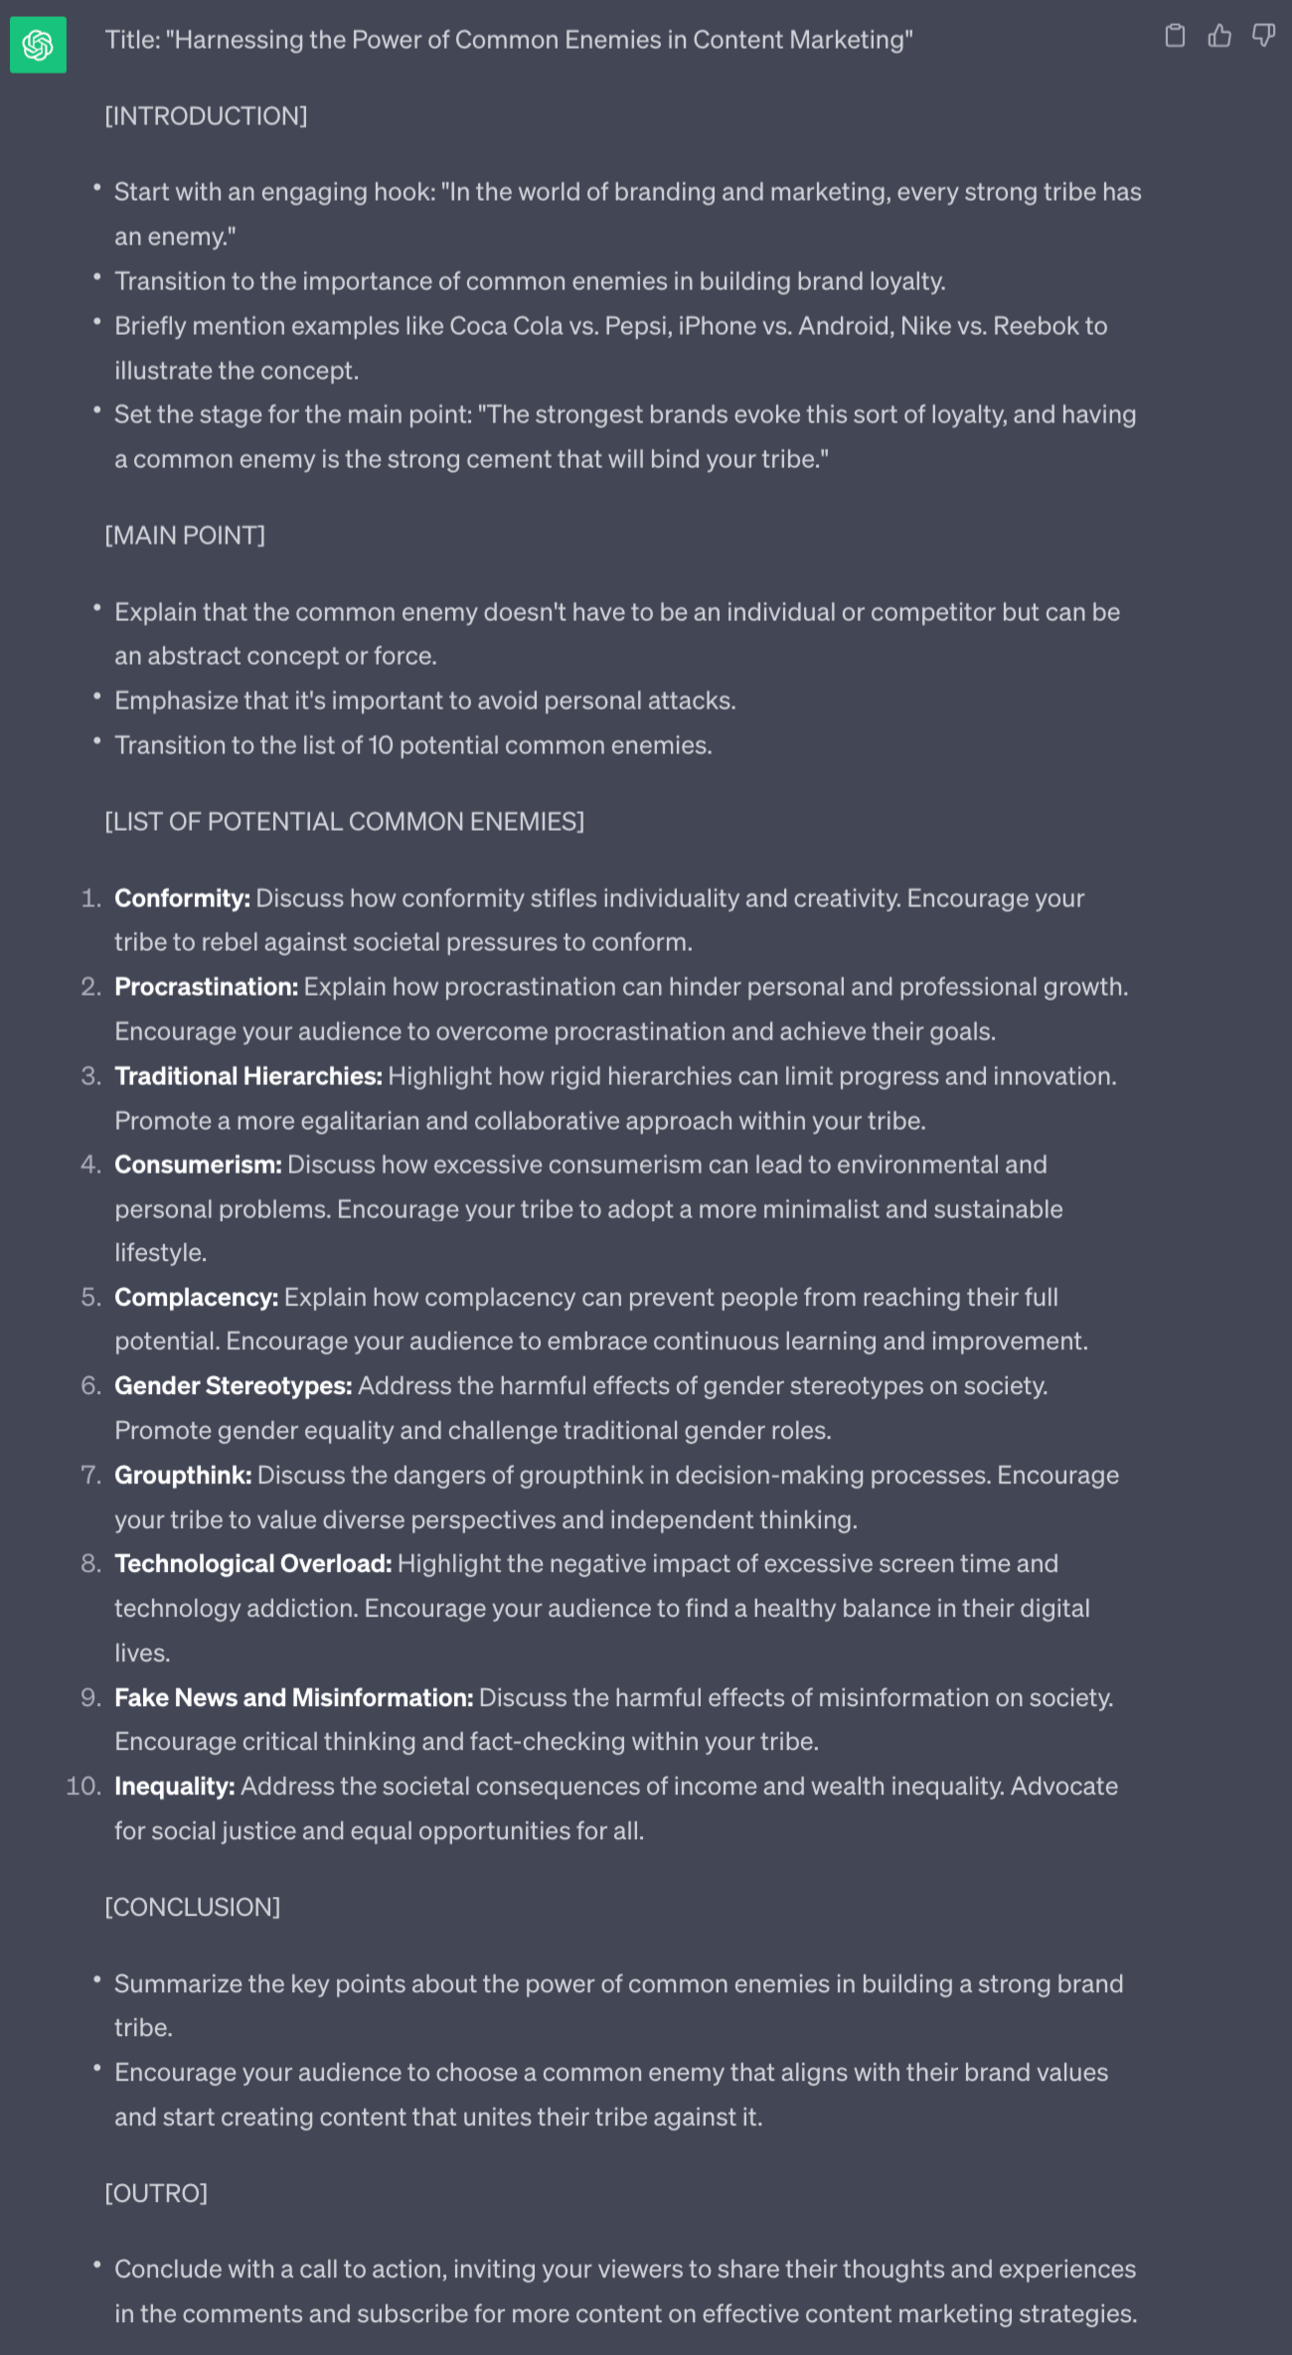
This output is a video outline.
Go through this and make changes to make sure your main point is covered.
Notice that this is not a line by line script. This is on purpose.
Reading from a script is quite dull for the viewer. Instead I highly recommend using a series of talking points like this.
We’ll cover the exact mechanism in the next Part but in short we’ll look at each line here, deliver naturally based on that, stop, read the next line, deliver the content naturally again and repeat this for the whole script.
The recording will obviously have a lot of us checking the script and not talking! But thanks to AI tools we can cut all of that out in seconds. The end result will be just us delivering the content.
For this reason a structured outline like this is perfect for delivery. You aren’t trying to remember any lines. You aren’t reading off an autocue. You are just reading a reminder then delivering in your own words.
However, I understand some people will still want a full script. That’s fine too! Let’s do that next.
An alternative script format is a line by line script.
The process of recording will be similar. Record a line, read next line, record a line, read next one etc. And then using AI to autocut out all the reading and leave only the spoken parts.
But this method we work with a line by line script, designed to be easily read without having to memorise complex sentences.
Here’s the prompt:
Act as a expert content marketer script writer

Convert this written long form piece into a video script

Write a line by line script.
Each line should be short and punchy and end with a line break for readability.

Do not include inserts, only text script

[copy/paste long form content]
This prompt makes every sentence short and sweet. This not only makes it easier for the audience to follow but also makes recording much simpler.
You won’t need to memorise any long sentences - each is designed to be a short punchy sentence.
In the next Part we’ll test out both these script formats and work out which works best for you.
The most important part of any video is the first few seconds - this decides whether or not a viewer stays.
This is important because watch time and retention are the most important metrics for video platforms. High retention videos will get shown more. And if people are leaving in the first two seconds of the video then you’re out of luck!
For this reason the hook - the first thing you say - is vitally important.
Let’s use ChatGPT to generate some variant hooks:
Analyse this video script and provide 10 potential hooks.

Be creative - anything for retention.

For each hook give a rating.

[copy/paste video script]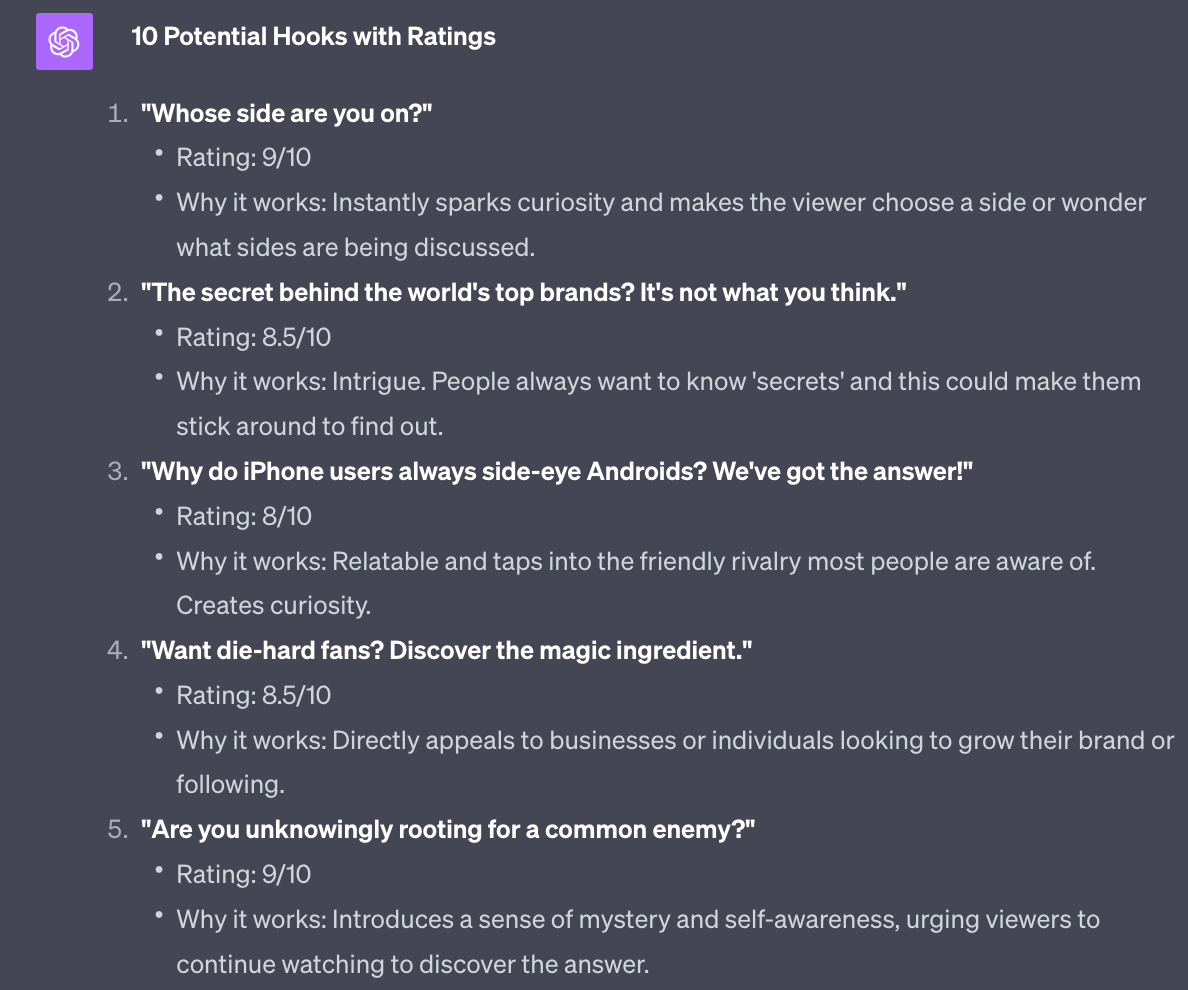
Asking ChatGPT to provide ratings and reasons helps us to filter the hooks. It also forces ChatGPT to analyse its own work.
Also, as an additional exercise ask for a 10/10 rated hook:
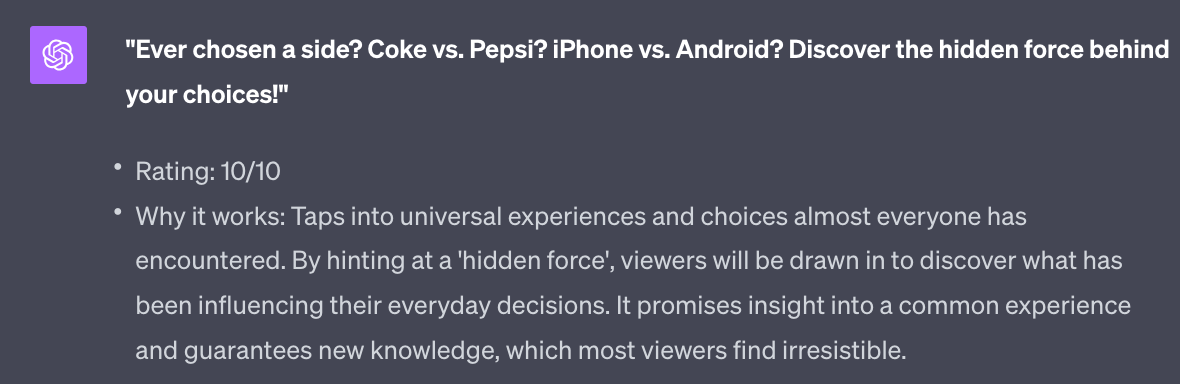
This is genuinely a great hook, starting with a question, referring to a set of well known rivalries and then hinting at a “hidden force” to build curiosity.
You’ll only get some great hooks to start your video with but will also get a crash course in what makes great hooks.
Next up we’ll get into the actual video production. I’ll show you how to record videos even if you aren’t comfortable on camera.
A reminder of what we’re covering this week :
Part 1: Creating Video Scripts
Part 2: Recording High-Quality Video
Part 3: Rapid video editing
Part 4: Multi-Purposing Content
Part 5: Publishing and Promoting Video
See you tomorrow Prompt Entrepreneur!
Until then, keep PROMPTING!
Kyle
In this Part we’re going to crack into the process of video production.
I’m assuming that you are not comfortable with video. And as such I’m making the process as simple as possible.
Creating video content is a skill - the steps here are to get you up and running with a basic system so that you actually start.
We’re not aiming for perfect. We’re aiming for done.
Let’s get into it.
This is always the first thing I get asked about my videos: what is your technical setup?
It’s the least important part of the process! But it’s what people get fixated on.
Truth is your tech set up doesn’t matter that much. Got an iPhone or Android? You have a great video creation tool already.
The tech isn’t what matters - it’s the content and how you deliver it. The camera, sound and lighting are nothing compared to that.
However - I’ll run through my setup in order to get this question out of the way. Just know that you don’t need any of this - you can do nearly everything with your phone camera or laptop web camera!
My personal set up on my laptop is:
Logitech Brio 4K webcam (~$180)
Blue Yeti X microphone (~$200)
Ring light (~$20)
That’s it for the recording equipment.
If you want to go higher budget use a DSLR camera so you can get depth of field.
I also sometimes just use my Airpods for the microphone - the quality is sufficient. I always use them if I also need to hear audio - for instance if doing a podcast with a guest or recording a live stream where audience members can ask questions.
For recording software I use Tella.tv.
It’s a nice lightweight recording tool that let’s me easily capture video, whether it’s just my camera, a screen share or both camera and screen.
Loom is also very good. Or CleanShot X on Mac if you prefer a pay once rather than subscription payment.
For editing I use Kapwing. This tool has AI built in to make the editing process much faster.
Both Tella and Kapwing are cloud based so the power of your computer doesn’t matter. Processing is all done in the cloud for you.
If you don’t have a computer you can do everything on your phone. Your phone becomes the camera, capture tool and editing tool.
I’d recommend grabbing a higher quality microphone (for instance AirPods) because the stock microphones on phones aren’t great.
Otherwise you can record videos straight to camera on your phone using the built in recording tools. Then you can edit using Capcut, my personal mobile editing tool of choice.
These are all personal recommendations. Everyone has their favourite tools and preferences. And very likely you’ll like different ones! But if you need a basic starting point then hopefully the above is helpful.
Always remember - as long as you have a phone you already have all the tools you need to produce video. Don’t let lack of equipment hold you back - that’s just an excuse to procrastinate!
The best way to get good at video is…recording video!
It’s a skill like any other. So you just need to get started.
The process we’ll be using will make it a lot easier. We’re lowing the barriers to entry.
Here’s the basic methodology.
In the last Part we generated scripts - I gave you two alternatives: either an outline of the ideas or a line by line script to directly read out.
Which one you use will depend on you and how best you deliver information. Try both and review the results. Then follow that scripting method from now on.
Get you camera set up and your script on screen.
Start recording.
Don’t worry about the dead space at the beginning whilst you check your notes. Instead take as long as you need to read the script and prepare your first line, even though you are already recording.
When ready look at the camera, hold for a second without saying anything and then deliver the line.
At the end of the delivery pause for a moment, continuing to look at the camera.
Now check the notes again and prepare the next line or section to speak about.
Repeat the process. Pause, delivery, pause, check notes, pause, delivery, pause etc. until the script is done.
Do not stop the recording. Let it roll.
The end result will be long. Much longer than your final video! And it’ll have all your weird muttering to yourself, swearing at your bad takes, reading your notes, drinking water etc.
It’ll all be in there, in one long weird video.
And that’s fine - in the next Part we’re going to use an editing tool that has an AI that removes ALL of that nonsense. Leaving only your script delivery.
As long as your deliveries are good the rest doesn’t matter at all. It’ll all be cut.
This allows us to focus solely on delivering the content. We can avoid the amateur mistake of stopping the recording, restarting, stopping, restarting - all the time getting more and more frustrated with ourselves.
We also don’t need to worry about memorising the whole script - we’re not Shakespearian actors and we don’t need to do this! Just get the gist of the single point you want to make, make it and move on.
This is also why I gave you two script formats - one with a rough outline for people who just need a nudge in the right direction and one with the exact line to deliver. Try both and once edited we’ll analyse the results and see which is better.
At this point you are in one of two positions:
You’ve recorded your first video and are hating me right now for putting your through the process. That’s alright - it’s what I’m here for!
You haven’t yet recorded your video and are waiting for a better time. AKA procrastinating.
Your first video will be rubbish. Sorry, but it will.
And that’s to be expected. It’s a new skill. We’re no good at things when we first do them.
But, we’re going to stick at it and become good at the skill. Because it’s a hyper valuable one! It’s worth the pain!
There are a few exercises I like to take people through when we hit resistance to shooting video.
The first is to go and look at the first videos your favourite Youtuber produced.
It might be Gary Vee, Pewdiepie, Dave Goggins or whoever. It doesn’t matter. Go back through their archive and look at their very first videos.
They weren’t good! And why would they be? They were just starting out.
What we tend to compare ourselves to however are the end results. I’ll never be as charismatic as Gary Vee on camera! We’re comparing us at the beginning of our journey to them at the top of their game.
As a reality check therefore go and see how they started. It’ll be a lot humbler and closer to your current reality.
Second, get used to your own face and voice on camera. Easier said than done I know! But it’s just a matter of immersion.
We are unused to our face on camera because it’s how other people see us. The way we perceive ourselves is actually in mirror image - we see ourselves a lot in mirrors and expect our face to be in that “direction”.
On camera though what is captured is how other people see us. If you aren’t used to being in photos or in videos then your face will look different to the mirror image expectation.
The same is true of our voice. The voice we hear when we speak is conducted through our skull and sounds different to the voice other people hear.
That’s why we get such a weird cognitive dissonance when we hear a recording of our voice: “that doesn’t sound like me!”
In reality that’s how everyone else hears you. Your own perception of your voice is the odd one out!
The only way to get over both discomfort with your face and your voice is exposure. The more you shoot and review the less of an issue this becomes. I used to hate with a passion my voice and face. But I just had to get over myself.
Exposure leads to familiarity and eventually you’ll be fine with it.
Third, commit to regular video production. I suggest 30 days, one video a day. It doesn’t have to be long - instead the idea is to just to get repetitions in. This helps you get over your voice and face and you’ll also become more fluid in your delivery.
Speaking on camera is a skill. And committing to a regular video a day for 30 days will make you better at the skill. You don’t even need to publish the video. Just keep a diary of what happened that day - in video form - on your phone. Publishing is less important than practicing.
The big next step in getting used to video production will be publishing.
We’ll be moving through editing and publishing over the rest of this Playbook.
However, as a member of the AI Business Breakthrough Community you have an additional asset : us!
To help build confidence with being on video please feel free to shoot a “hello world” video.
Say who you are, what you are working on and what you need help with.
It doesn’t have to be fancy - just phone and no script required.
The main purpose is to become more comfortable with video.
Upload your hello video into the main chat and I’ll be certain to respond.
Also, as we move forward feel free to post videos into the Community for (constructive) feedback. That’s a lot harder I understand. But getting friendly feedback in a closed community can do wonders for your content moving forward!
Now that you’ve shot the content of your first video we have enough to move to the editing process.
Don’t worry - it’s not technical. Instead we’re going to use AI tools to make editing a doddle.
A reminder of what we’re covering this week :
Part 1: Creating Video Scripts
Part 2: Recording High-Quality Video
Part 3: Rapid video editing
Part 4: Multi-Purposing Content
Part 5: Publishing and Promoting Video
See you tomorrow Prompt Entrepreneur!
Until then, keep PROMPTING!
Kyle
Now that you have some raw video we’re going to edit it to prepare it for publishing.
If you’ve been following along you’ll have one long take that includes all of your ums, errs and silences whilst reading the script before delivery.
Not to worry - we’re about to slice and dice all that out automatically.
First we’re going to process our raw video so that all the silences are removed. We shot the video in a way that means once the silences are out it’ll flow together nicely.
There are a few AI tools that can do this for you totally automatically.
Personally I use https://www.kapwing.com/ . I’ve tried a bunch of different tools and this one does the best for me. It’s a bit more expensive but that’s because it’s a full edit suite. We can use it for all the steps I’ll be explaining.
If you want a tool just to remove silences and mistakes I recommend https://www.gling.ai/.
Both have free trials so feel free to check them both out.
I’ll be focusing on Kapwing but giving alternatives for the rest of the steps moving forward.
First make sure you have your raw video file available. If you’ve used a tool like Tella or Loom download the file. I recommend as high a resolution as possible to ensure quality. Each tool you use will tend to compress the file and lose quality a bit so we start with the highest possible quality possible.
In Kapwing create a new project and you’ll see this screen:
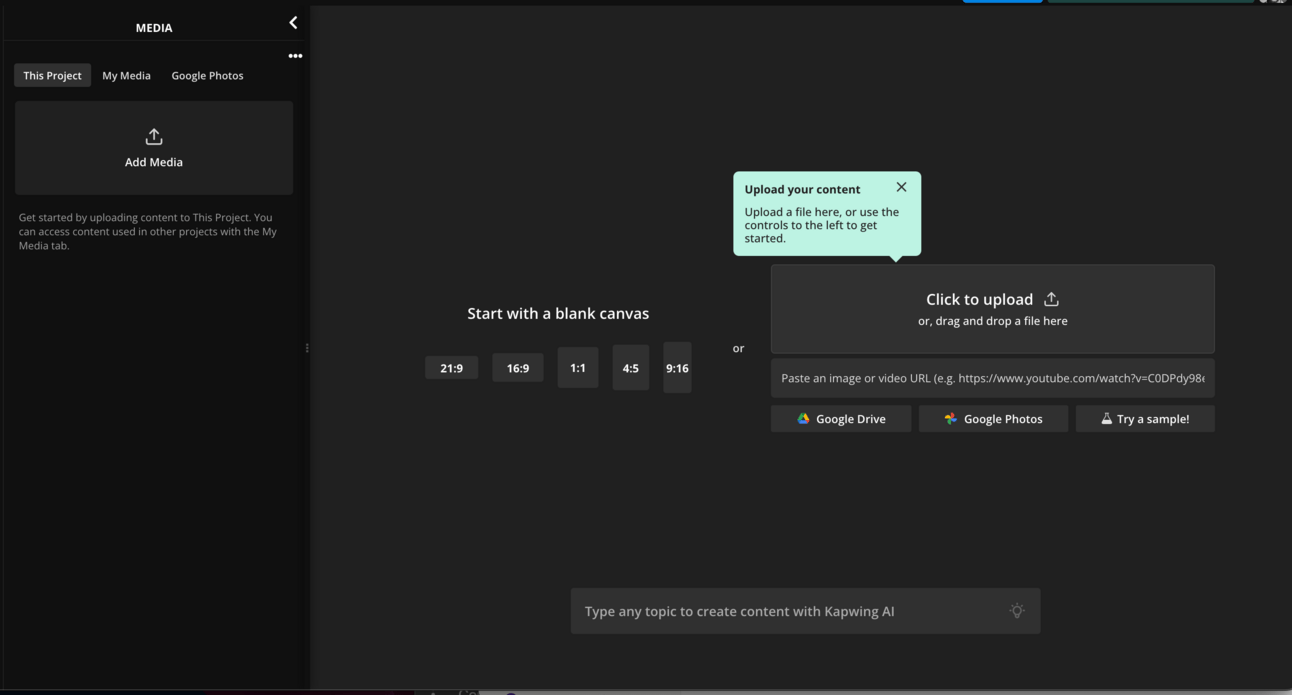
Just drag and drop your video file into this screen and wait for Kapwing to upload the video and you see this screen:
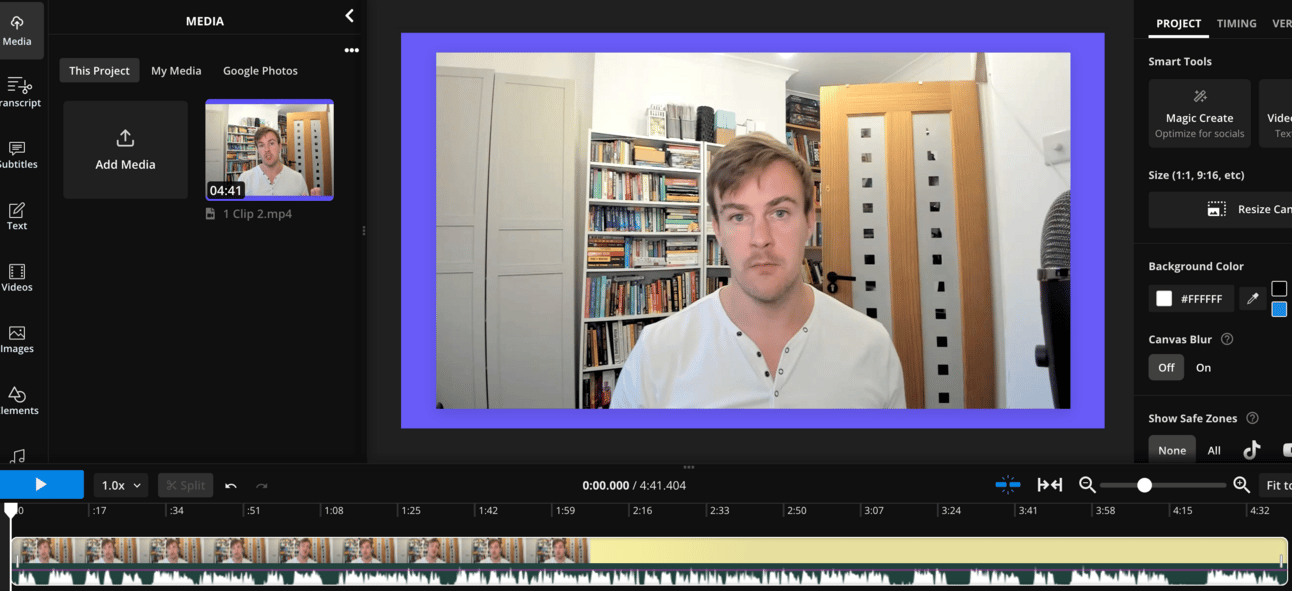
This is the main editing panel. Looks pretty complex! But don’t worry - we’re going to keep everything simple for now. We can use Kapwing for simple, automated editing and for more complex work if we want to do that later. It’s versatile and will scale to your needs as you become more confident.
All we’re going to do is click on the timeline at the bottom:
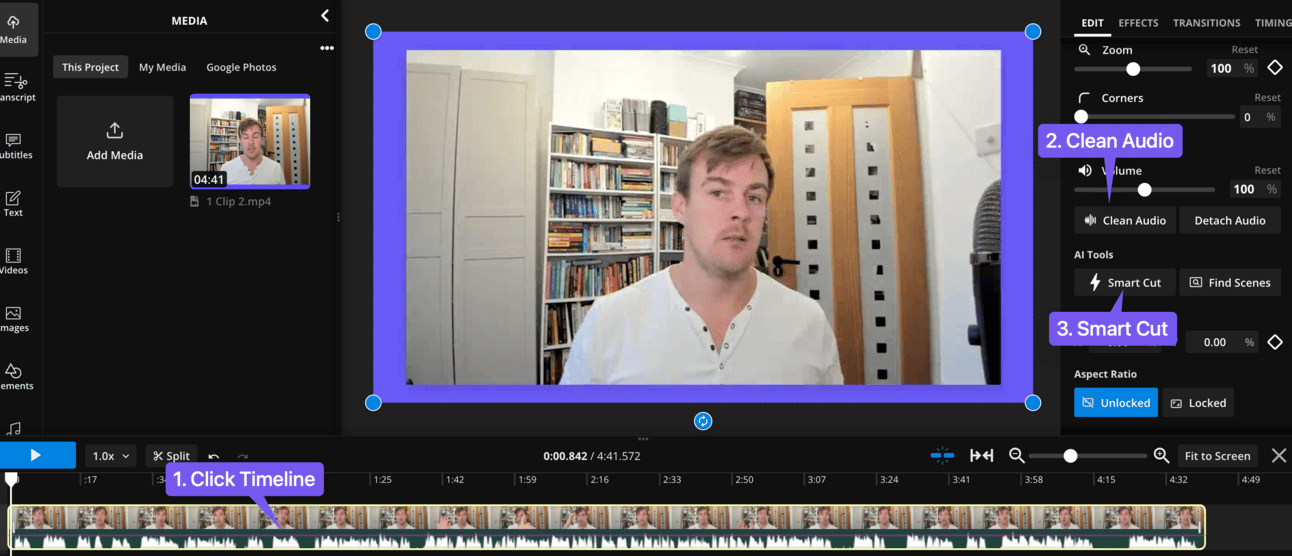
First click on the timeline at the bottom. This selects the video.
Next click Clean Audio. This will run a process to tidy up the audio, level it out and generally make it sound more professional.
Then click Smart Cut. This is where the AI kicks in and does a lot of the work for us.
You’ll see a screen like this:
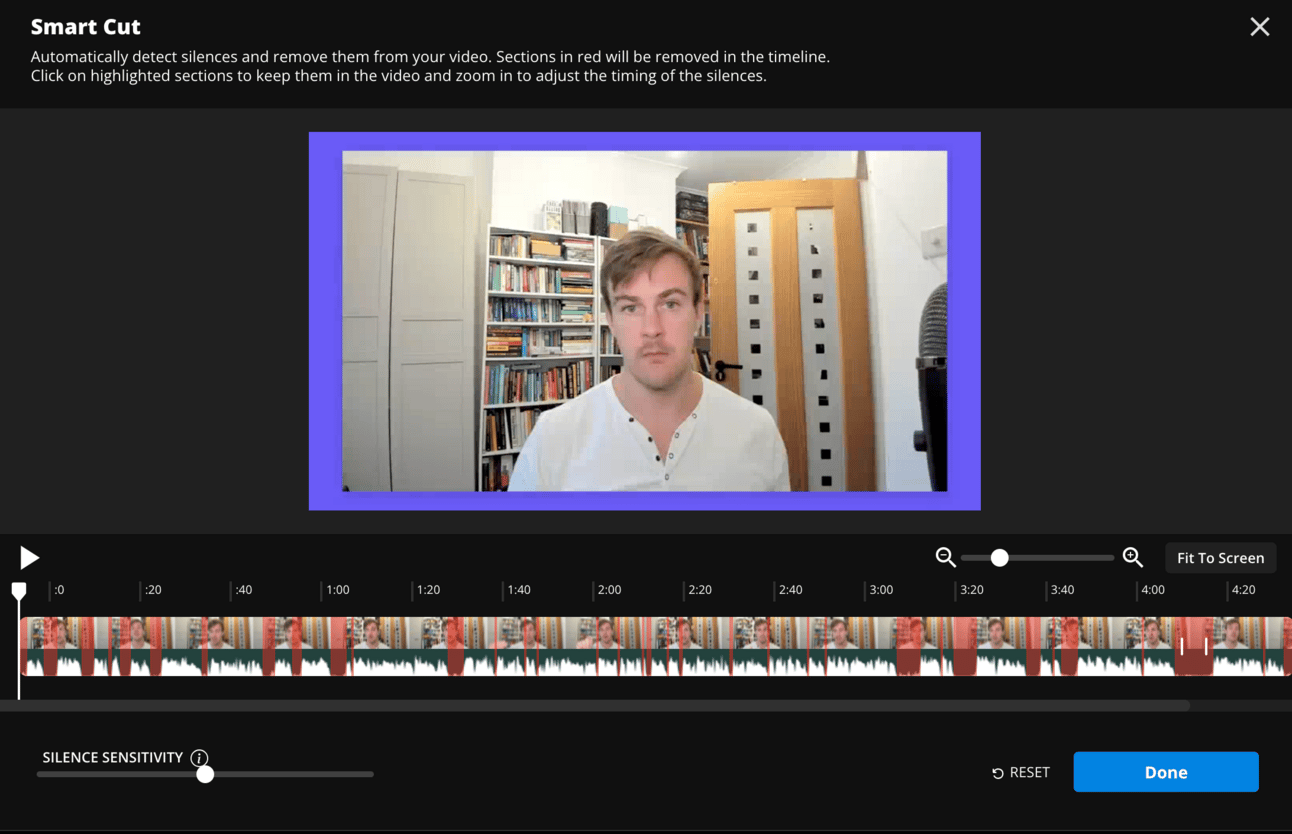
All the red areas are my silences.
This are the points at which I was reading my script and working out how to deliver the content.
Or they are simply points when I needed a break to gather my thoughts before moving on.
If they were left in the video it would be unwatchable! And if I was editing manually it would be a pain the arse to find and cut all of these bits out.
But SmartCut does the job for us, identifying and clipping them all out.
Go ahead and click Done and SmartCut will do its job. You’ll have a fully edited video.
If you were careful during recording and got all of your lines delivered perfectly then your job is done - the SmartCut will have done enough to clean your video ready for publishing.
Chances are though that you had some missteps and had to restart certain lines. No problem! We’ll now tidy up those elements.
Personally I put the whole video on 2x speed for this part. There’s a dropdown next to the main play button. Putting it to 2x will speed up this next step as it allows you to “scan” the video faster.
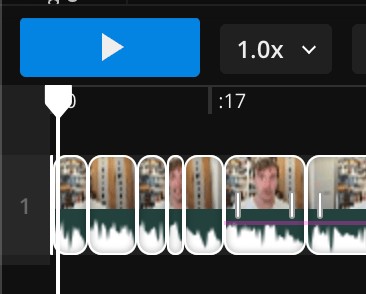
Go ahead and press play and watch the video. Pay close attention to the cuts between videos. In the image above there are 7 clips visible. Each square is it’s own clip and the line between each clip is where the cut is.
You may find that some of the clips just have you saying “um” and nothing else. Click on those clips and press Cmd+Backspace (Mac) or Cntrl + Backspace (PC). This will delete the “um” clip and the space itself - bringing the two clips either side together where the “um” mistake used to be.
Also look out for parts when you started, made an error, stopped and started again. When this happens delete the clip with the error, again with Cmd+Backspace and that should be enough to correct the video.
If you need to extend or shorten a clip grab the little “handles” (white vertical lines) at the side of the clip and drag them. You shouldn’t need to do this much but it’s helpful to know how.
Continue doing this until you’ve cleaned up the video. Give it another watch through at 2x speed to make sure it’s tidied.
If you’ve watched my videos you’ll know that I’ll often bring the prompts up on screen and walk through them.
Adding imagery like this is nice and easy in Kapwing. Just drag and drop any image you want over your video and it’ll be inserted at that point in the video.
First navigate using the timeline to where you want the image to appear. This is the “in” point.
Then go ahead and drag and drop the image over the main video window. This will insert the image.
By default any image will stay for 3 seconds exactly. If you want to increase this you can drag the right side of the image in the timeline to the end point where you want the image to disappear. If you can’t “catch” the right hand side of the image then zoom into the timeline until it’s larger and easier to manipulate.
Adjust the position and size of the image by dragging it around in the main video view. One weird peculiarity is that Kapwing by default gives images non-fixed aspect ratios. As you resize it you’ll start to see bits of the image disappear. Very annoying. To fix this click on the image and then in the right hand side options make sure Aspect Ratio is set to locked.
Also I recommend adding a basic transition so that the appearance and disappearance is less abrupt. In the same options menu click Transitions, choose a style and apply to Both intro and outro.
We can also use AI to generate and add subtitles. These are super helpful for audience members whose first language is different to our own - for example non native English speakers find my English subtitles make it a lot easier to follow along with my spoken English.
To do this we first transcribe. In Kapwing click the Transcript button in the left hand menu.
Set your language and click Transcribe. Give Kapwing a few moments to perform the transcription and synching process.
You’ll see a text version of your script appear in the left. It should be fairly accurate - Kapwing has one of the best voice transcription tools I’ve used.
Let’s add the subtitles. Click Subtitles and select your options:
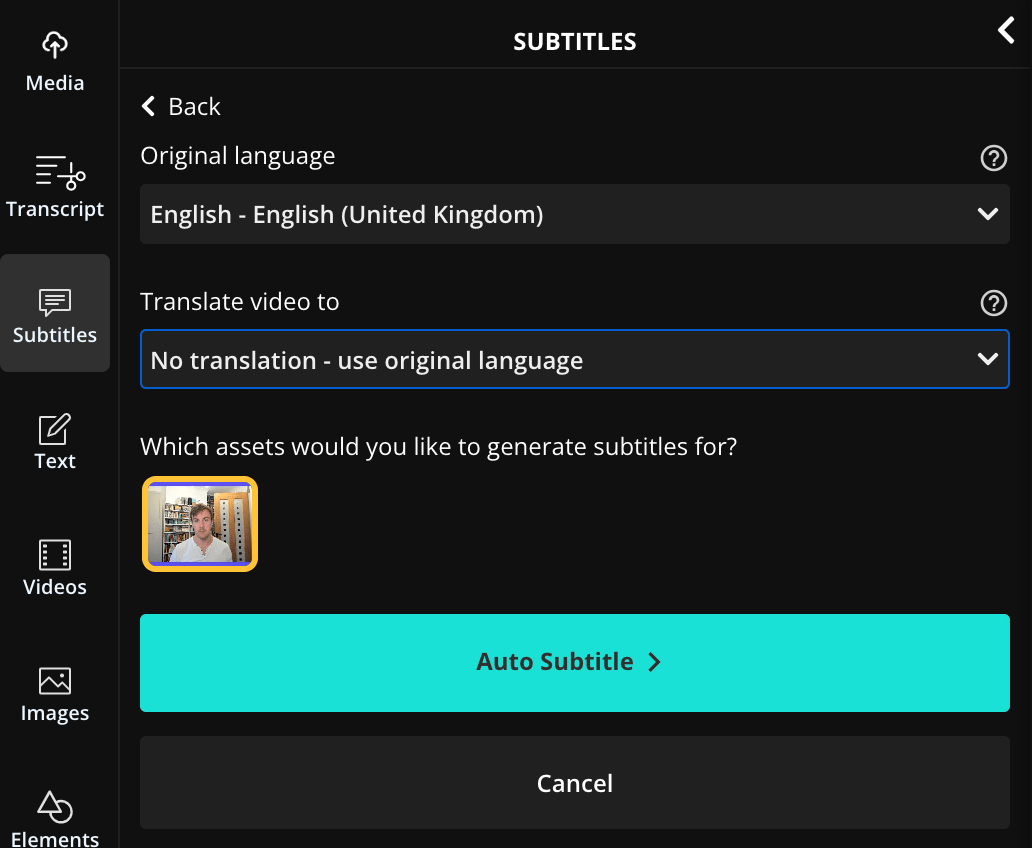
Generally you’ll select your original language and add the subtitles in your original language too. Then hit Auto Subtitle to add.
Give the subtitles a quick read through and edit any words that it gets wrong. For instance it (and all voice transcription!) tend to called Chat GPT “Chat GBT”. Just adjust these errors directly.
You can’t edit the transcription - only the subtitles. So make sure you are in the right section.
Play the video and you’ll see the subtitles synched up to your voice. It should be very accurate.
You can also change the style of the subtitles themselves. Click on the new subtitle layer in your timeline - it’ll be orange coloured and will contain text. Once clicked the style menu for the subtitles will appear in the right options menu.
Click View All to see the various subtitle options and choose the one you want. You can also manually adjust the font and other options if you need finer control.
Adding your own images into our video is all well and good but it can be very time consuming, especially on longer videos.
If you want to rapidly increase the visual attractiveness and how engaging your video is use Kapwing B roll tool.
It’s hidden away a little so I wanted to take this opportunity to flag it up.
Click Images > AI B-roll tool.
Kapwing will take a moment to analyse your transcript then it will generate images to add.
For example here’s the b-roll suggestion for when I say “how to get good at recording videos”
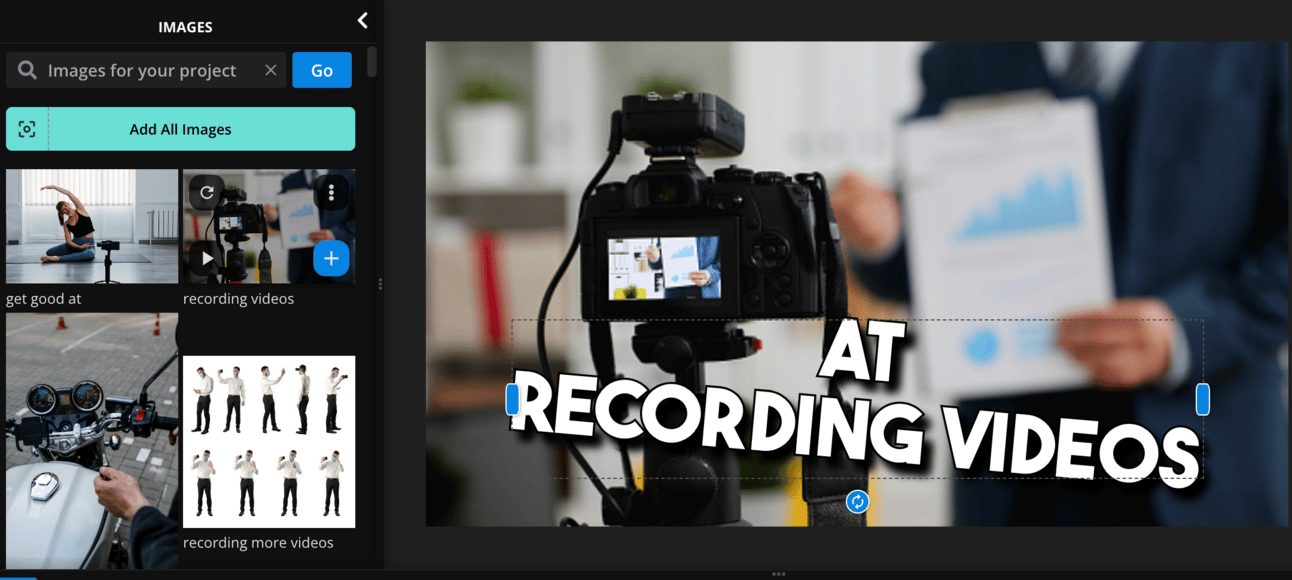
It has suggested an image of someone recording a video. I like that one so I go ahead and click to blue plus sign logo to add it automatically into my video.
I continue down the suggestions adding the ones I like.
I can also Add All Images but I personally tend not to as the quality varies massively. I prefer to manually choose a handful that are good instead.
Use this tool to provide a baseline of b-roll visual additions. Then add your own images as well to really up the quality of your final videos.
Whether you’ve done a quick SmartCut and left it at that or gone deep and adding images, subtitles and a more refined cut you’ll now have a complete video.
Remember this is your first video. Perfect is the enemy of good. We’re going to move onto getting everything published ASAP so you can begin to gauge reactions and improve your videos.
So don’t obsessively edit and reedit - get something decent and move on! We’ll get better at editing later!
A reminder of what we’re covering this week :
Part 1: Creating Video Scripts
Part 2: Recording High-Quality Video
Part 3: Rapid video editing
Part 4: Multi-Purposing Content
Part 5: Publishing and Promoting Video
See you tomorrow Prompt Entrepreneur!
Until then, keep PROMPTING!
Kyle
Once we’ve got our first video shoot and edited we have an asset that we can immediately publish. We’ll cover the publishing and marketing process in the next Part.
Before we do so though I want to cover multipurposing - how we can convert a video into different formats for different platforms and uses.
There are two primary parameters here: length of video and aspect ratio.
Length is how many minutes the video is. Certain length videos work better on different platforms - for example short videos work on TikTok and longer videos on Youtube.
Aspect ratio is the “shape” of the video. Videos on Youtube tend to be horizontal, ie. wider than they are high whilst videos on TikTok and other mobile first platforms are vertical, higher than they are wide.
What you focus on depends entirely on your target platforms. I’ll show you a framework for multipurposing that applies to any content.
The basic flow is:
Decide platforms
Change aspect ratio
Change length
First up we need to decide what platforms we want to create video for.
This depends on where our audience hangs out!
Let’s use a basic prompt to point us in the right direction:
Act as a market researcher

My business niche is [topic]

Give me a list of all the potential social media platforms that utilise video, in order of importance for my niche
Put in your particular niche so that ChatGPT can better make suggestions about the best platforms.
I’ve used “AI to start businesses” as the example niche here.
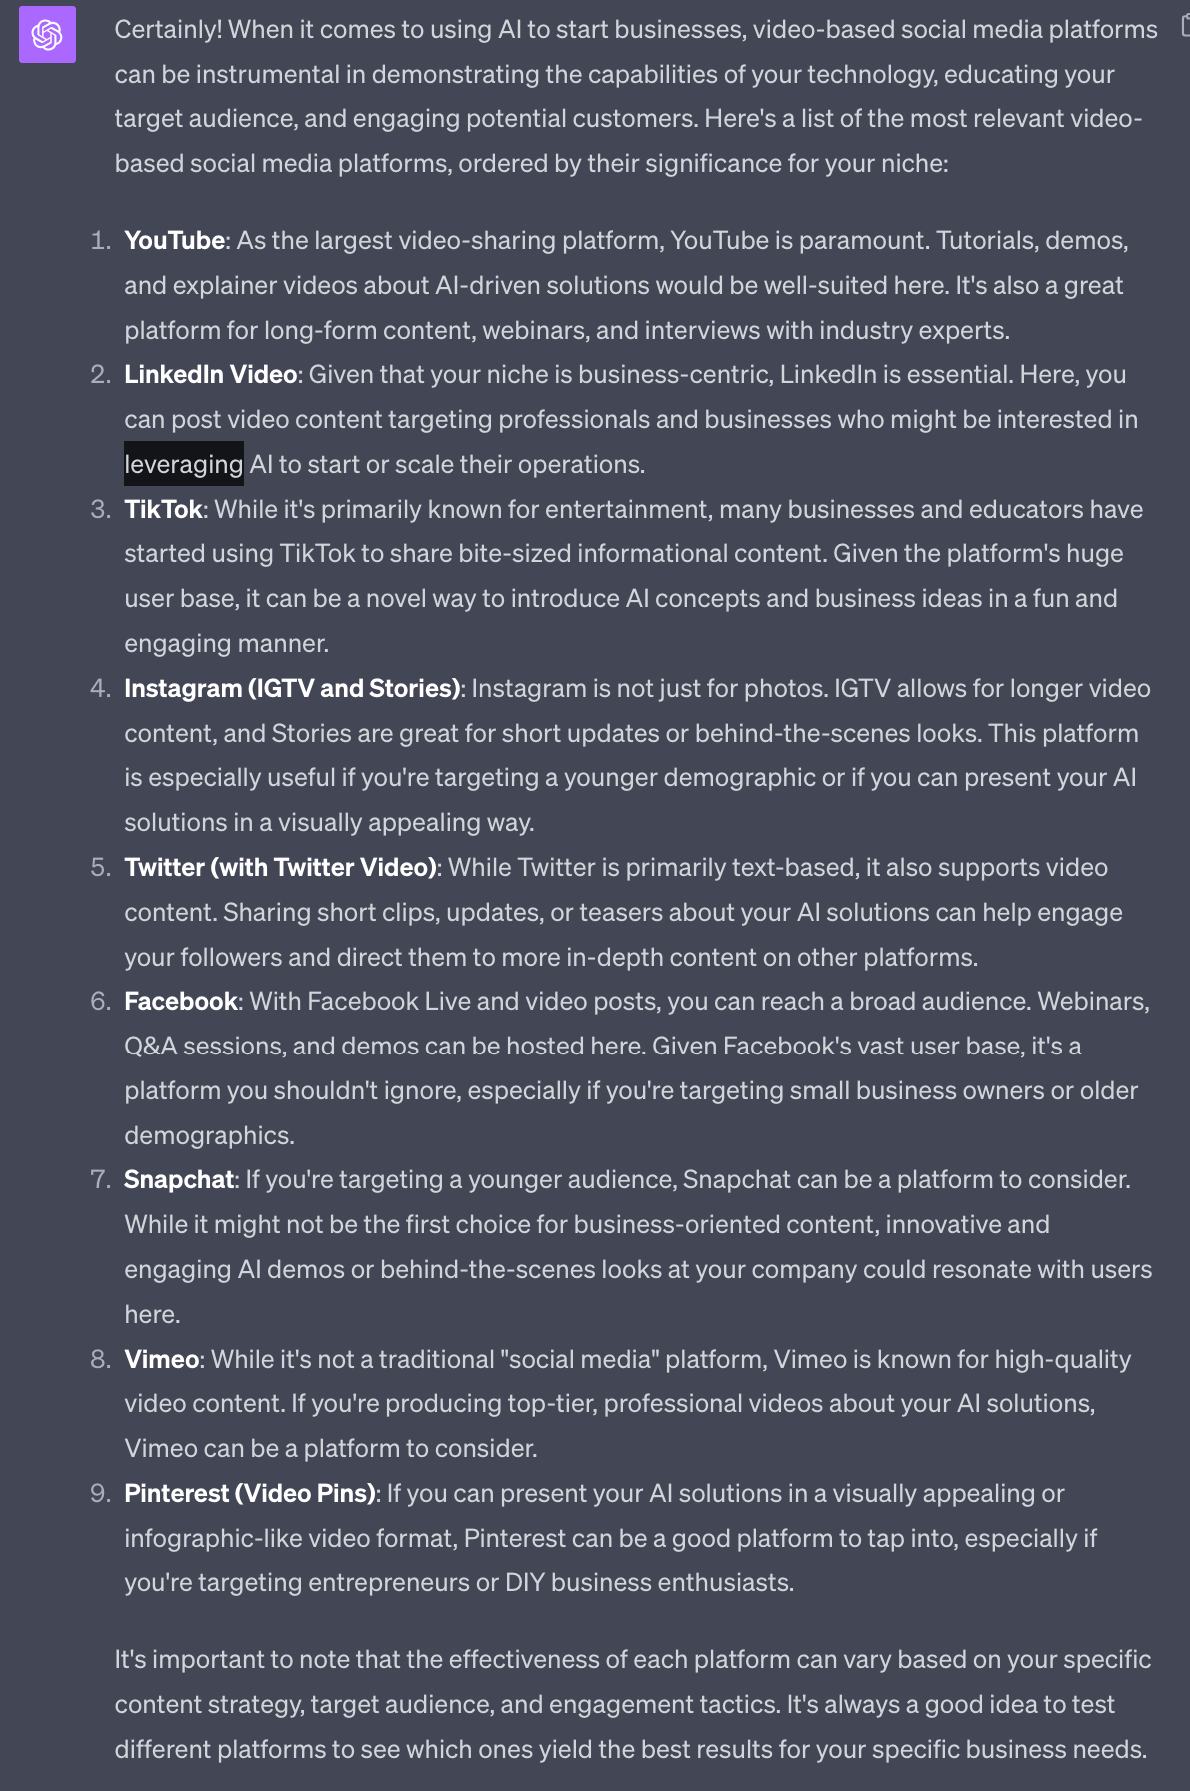
ChatGPT will output the main platforms in order of significance.
This order for “AI to start businesses” as the niche is pretty spot on:
Youtube for longer form guides
LinkedIn to focus on businesses
TikTok and Instagram because they are so video focused
I’d personally put X further up for me but that’s because i) I have a following there and ii) in more recent times X has begun to prioritise video. ChatGPT doesn’t have knowledge of these two facts. Use your judgement as always.
First we optimise for aspect ratio. This is the “shape” of the video.
Generally all platforms can take multiple aspect ratios - but they will display strangely.
For instance you can upload a widescreen horizontal video to Tiktok but it’s going to be presented very small with wide black bars above and below it. It’s not ideal.
Therefore we want to make sure to use the right aspect ratio for the platform.
Once you’ve decided the platforms you are targeting here’s the process.
I will assume that you shot your videos in horizontal video. If using a webcam this will have been the default. It’s also easier to go from horizontal to vertical which is why I used horizontal in previous Parts.
Open up your project and make sure nothing (no video, audio, subtitles) are selected.
In the right hand options menu you’ll see an option that says “Resize Canvas”. Go ahead and click this:
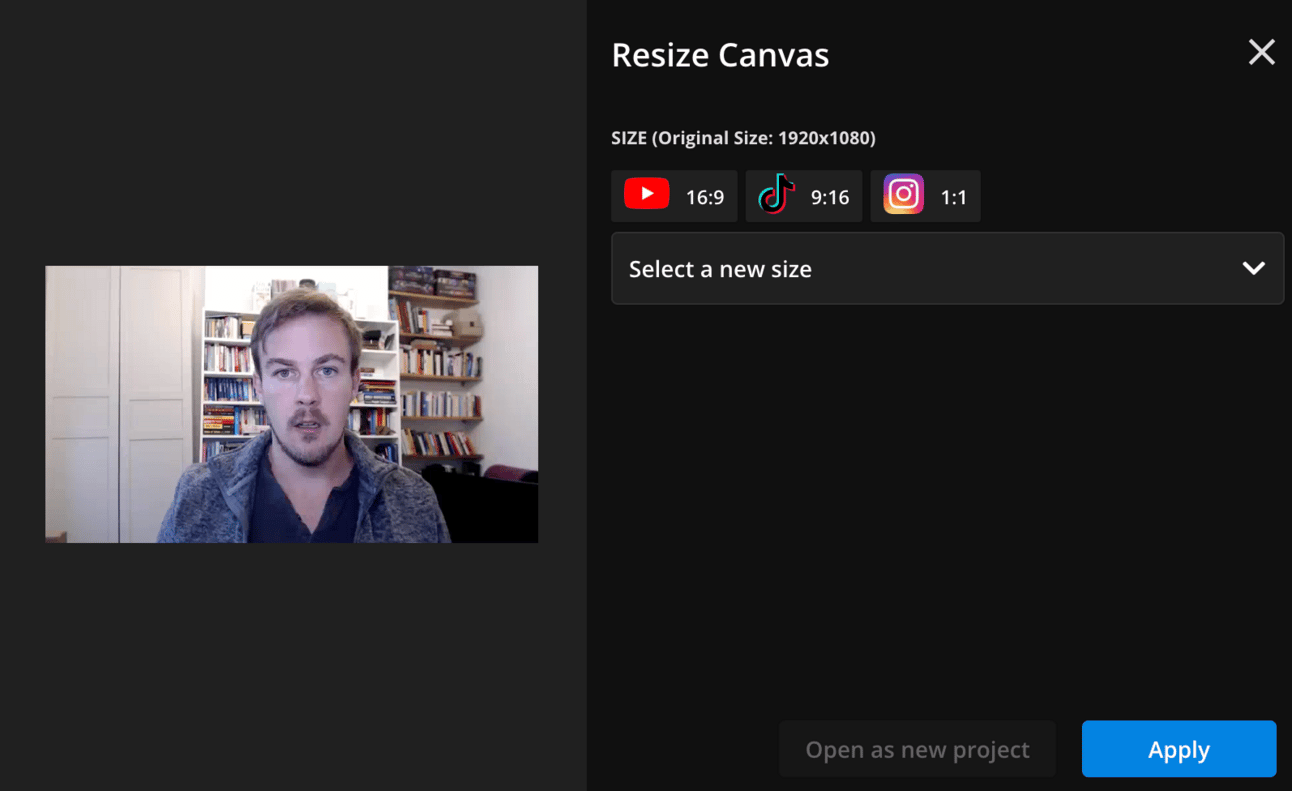
You’ll now be given a screen that has the different sizing options. Helpful it has all the major social media platforms built in!
Choose the platform you want to create a video for. I’ll choose TikTok.
This will give me more options:
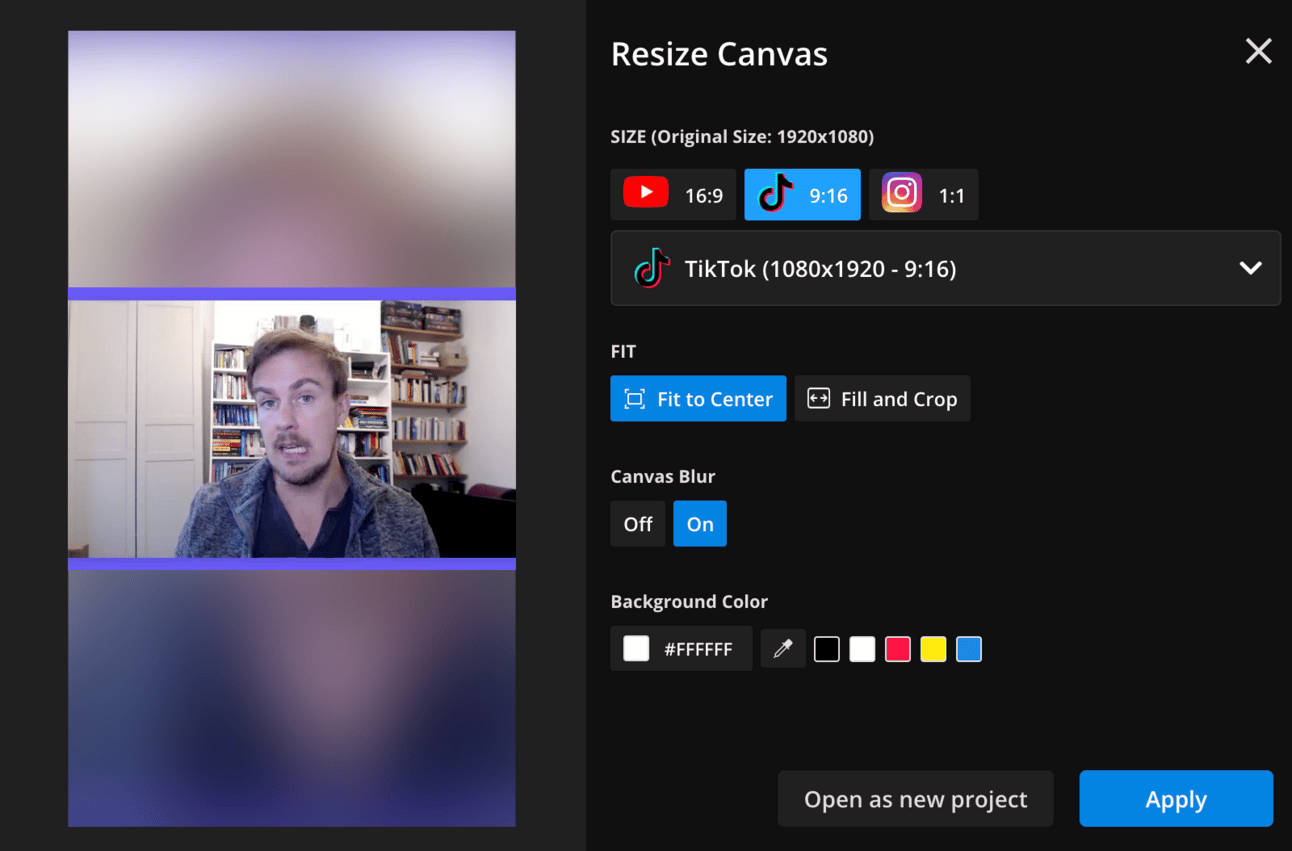
The default option is “Fit to centre” which makes a TikTok shaped video by adding bars around the top and bottom. This works in a pinch - it’s fast and allows you to quickly publish. If happy with this click Open as a New Project.
This will create a new project in TikTok format from which you can export.
Alternatively click Fill and Crop:
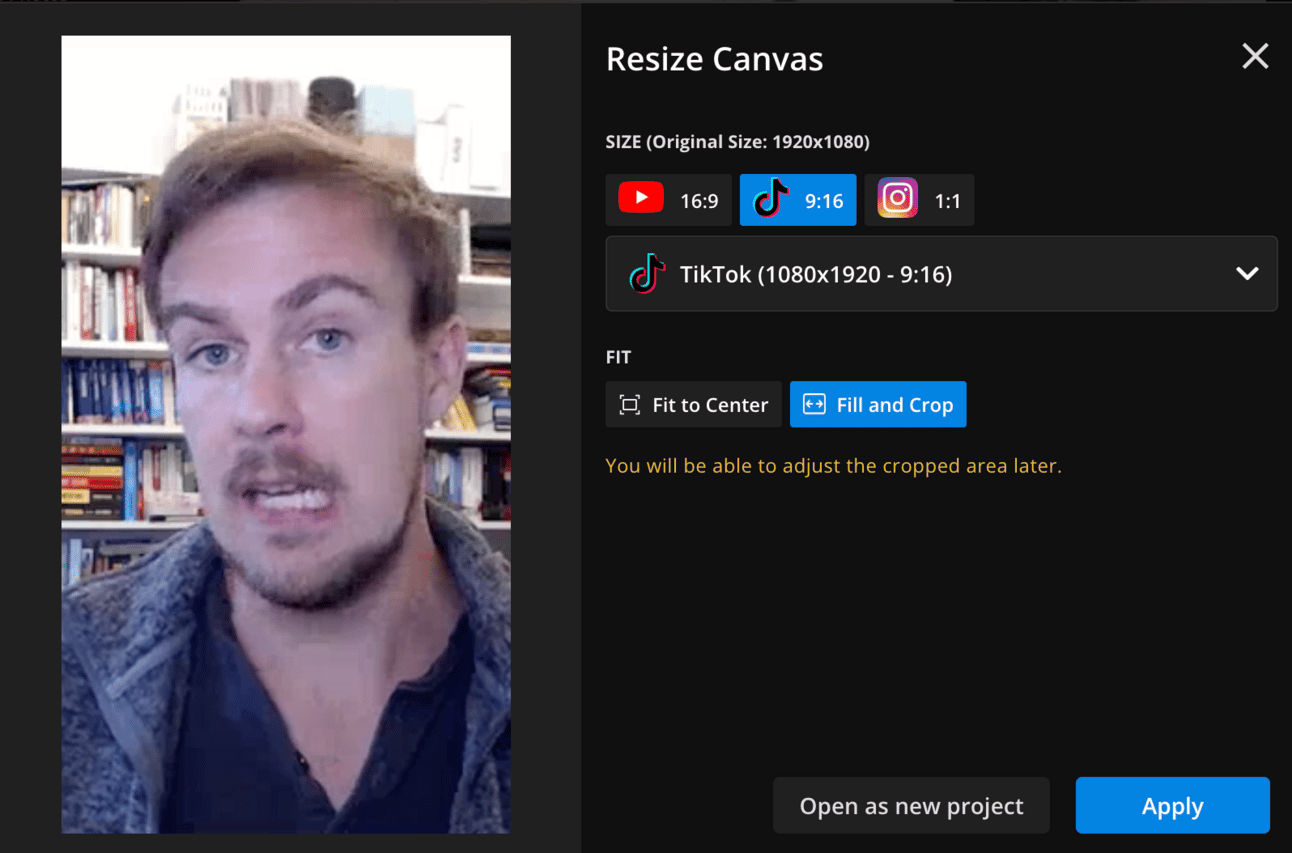
This “punches in” to the video, focusing on the centre element. In this case my face. Importantly you also have the ability to make edits to this format. We’ll do that next. Go ahead and click Open as New Project.
Kapwing will automatically adjust subtitles that you’ve added - making them fit the new aspect ratio.
The main task for you will be to resize images. They get shrunk when changing to a smaller format like TikTok’s 9:16. Therefore find all your images in the timeline and adjust them so they are large enough to be visible.
Apart from that if your video is primarily you delivering to camera there shouldn’t be too much more work needed to reformat.
Repeat this for any other formats you need. You’ll normally just need one horizontal (your first video) and one vertical and you’ll have most bases covered. Instagram Stories/Reels take the same 9:16 format as TikTok thankfully.
Once you’ve created your various aspect ratios we want to create shorter clips.
You’ll mainly be doing this for your vertical videos. Vertical video formats are used for TikTok, IG Reels and Youtube Shorts. All are short length, vertical format. Therefore we’ll be cutting shorter clips out of our vertical video project.
The basic idea here is to cut down longer videos into sub 1 minute clips. These clips should themselves be valuable, even without the rest of the video.
This can be done manually by going through the video and adding edits at sensible points. But we’re Prompt Entrepreneurs and are going to be smart about this.
Go to Subtitles and find the Download button above your generated subtitles.
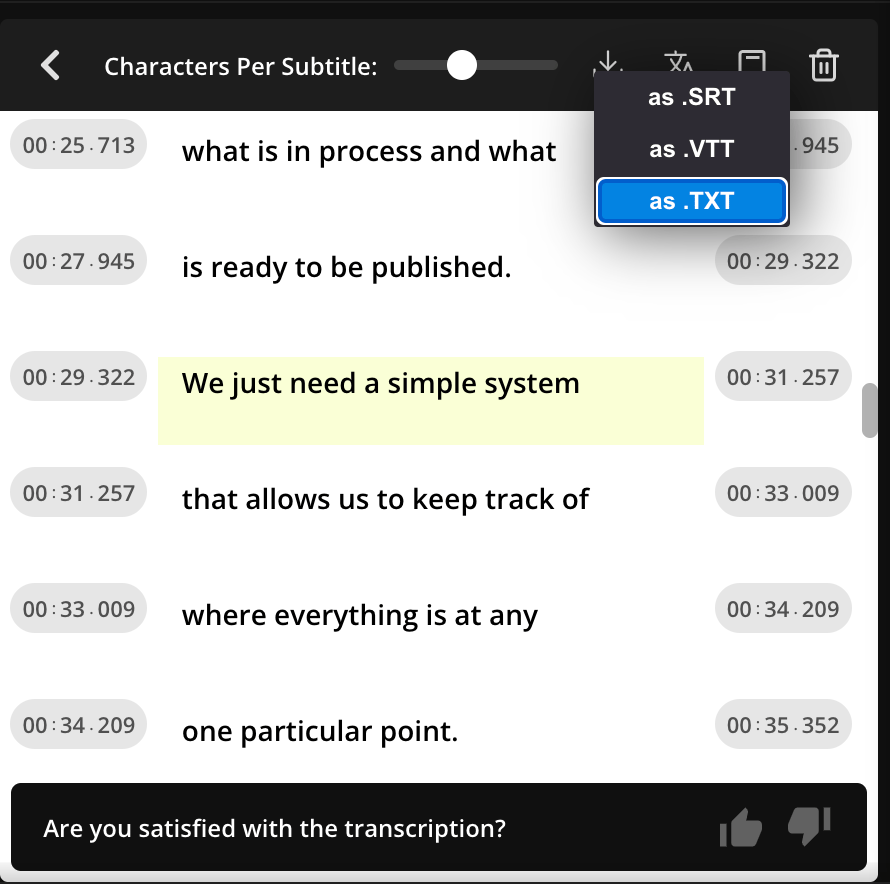
Download your subtitles in .SRT.
Once downloaded change the file name from subtitles.srt to subtitles.txt.
This changes the file so that i) we can easily open it and ii) we can upload it to ChatGPT. Smart eh.
If you open the file you’ll see this:
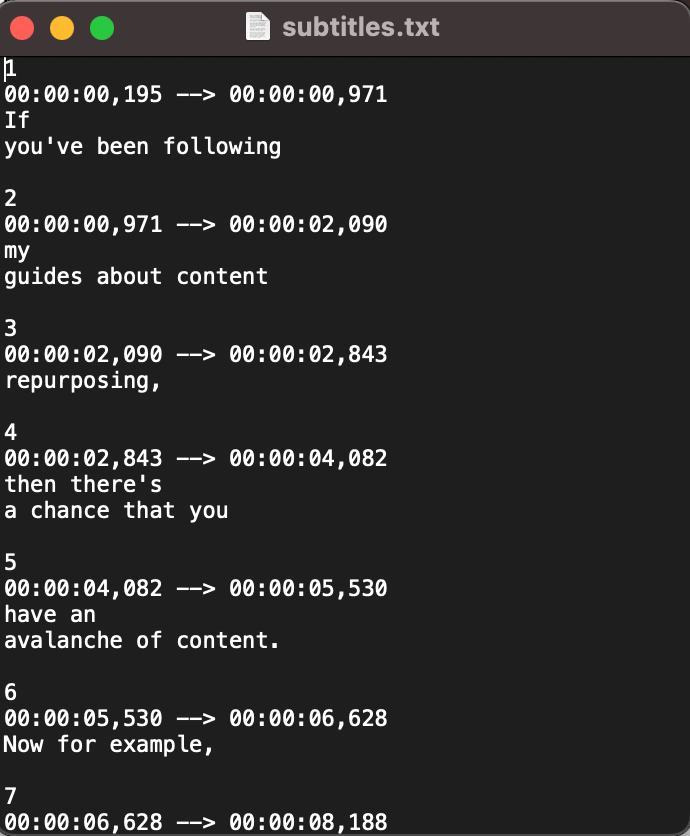
Those number are timecodes. They tell us when certain words are being said. This will be useful shortly.
If your video is long (say, 10 minutes or more) head over to ChatGPT and use this prompt:
Act as a social media video editor.

Use the attached script with timecodes to suggest clips that can be taken from this longer video

Suggest 3x ~60 second clips  and 3 x ~30 second clips. They can be shorter.

Clips should be concise, actionable and complete in and of themselves

Provide the scripts of the clips along with in and out points
If it is short, around 2 minutes or so use this prompt:
Act as a social media video editor.

Use the attached script with timecodes to suggest a clip that can be taken from this longer video

The clip should be concise, actionable and complete in and of itself

Extract the best ~30 second clip from this video. It can be shorter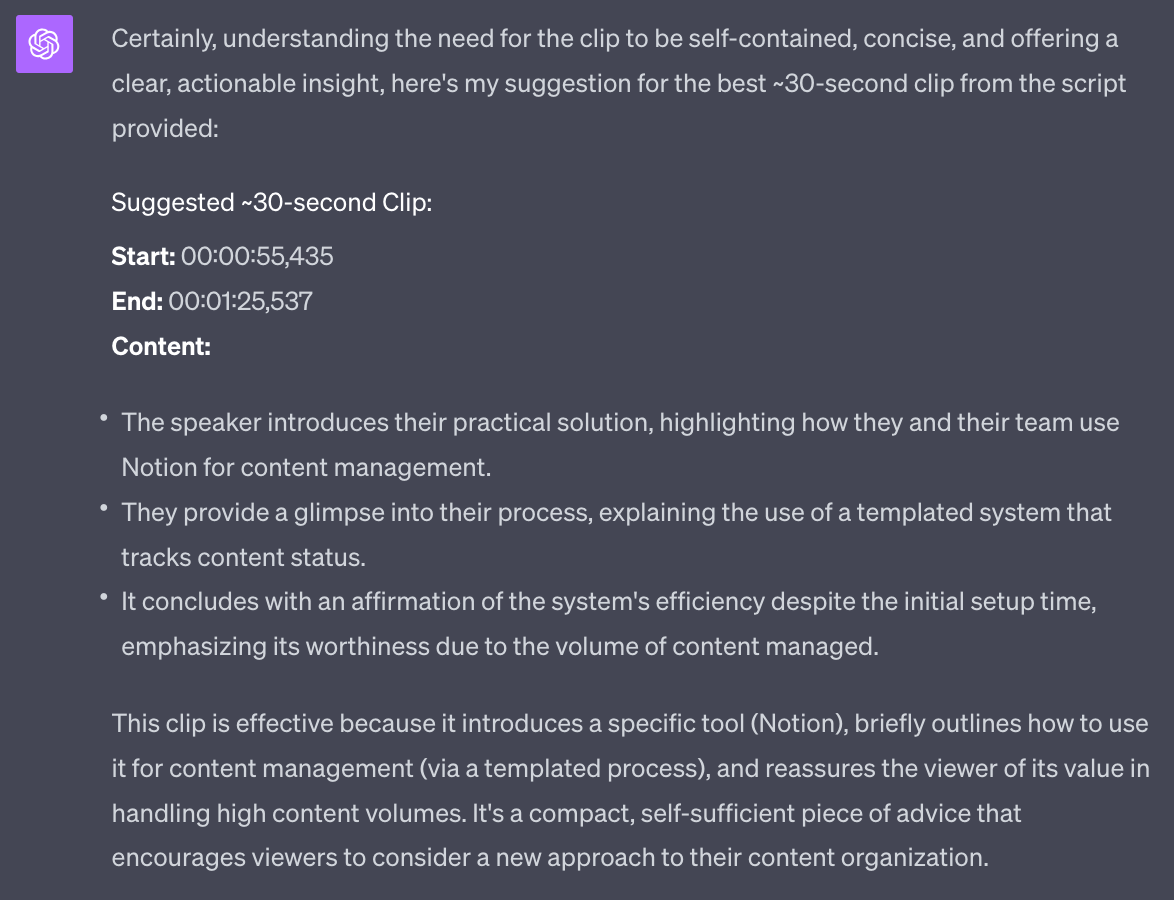
ChatGPT will read the script and extract the best parts of the video for you to clip out. It’ll even include the timecode so you can edit exactly at those points.
Some of the above steps can be time consuming - especially finding and cutting clips from out of larger videos.
I want to share with you the Waitlist for Kapwing’s not-yet-released features.
You can be first in line by filling in your email here: https://4kaupuj99vi.typeform.com/to/aaTC7bHr?typeform-source=www.kapwing.com
I don’t work with Kapwing by the way - just think it’s a great tool!
By getting on that list you’ll get early access to more advanced AI tools like one that automatically finds and clips our highlights. Perfect!
Alternatively if you don’t want to wait there’s a tool on the market that already does this called Munch. Here’s the link https://www.getmunch.com/.
A reminder of what we’re covering this week :
Part 1: Creating Video Scripts
Part 2: Recording High-Quality Video
Part 3: Rapid video editing
Part 4: Multi-Purposing Content
Part 5: Publishing and Promoting Video
See you tomorrow Prompt Entrepreneur!
Until then, keep PROMPTING!
Kyle
We’re now at the point where we can take our videos and begin to publish onto our chosen platforms.
We’ll cover the remaining assets needed and go ahead and finally start publishing!
Our video caption is the text that appears below our video. Most social media channels have some form of text caption or description.
Their purpose is not only for our audience members. It’s also for the platform itself. Our caption gives us space to say what our video is about. This text is used by the platform to show our content to the right people.
It’s a basic form of SEO (Search Engine Optimisation). We need to ensure that we use our caption to help with discoverability.
Captions differ depending on the platform. Therefore adapt this prompt as required. I’ve built it with Youtube and TikTok in mind and I’ll show you how to adapt after the prompt:
Act as a social media manager.

Write captions for my video.

I will provide the transcript of the video to act as the basis of the caption.

Start with a strong hook to capture attention and encourage watching.

Decide a keyword based on the video content.

Provide an outline of the contents.

Create captions for these platforms

#Youtube
Include the main keyword or phrase for your video in the first 1-2 sentences of the description. This helps signal to YouTube what the video is about.
Write a description that is at least 500 words or longer. More descriptive text can help Google understand the topic and content of the video.
Include related keywords naturally throughout the description, but don't over-optimize. Write for humans, not search engines.
Add links to other relevant videos on your channel and to external sources for more info. This helps with both user experience and SEO.
Add a call-to-action toward the end of the description to prompt viewers to like, share, subscribe or visit your site.

#TikTok
Put the most important keywords and phrases in the first 1-2 sentences of the caption.
Write a description that is at least 500 words or longer. More descriptive text can help TikTok understand the topic and content of the video.
Use relevant hashtags toward the end of the caption to help with discoverability and tap into larger conversations.
Add emojis and personality to your captions to engage viewers. TikTok is a social, fun platform.
Include a call-to-action to view more videos on your profile or visit your website or social channels.

Text of video begins:
Simply copy paste the transcript of your video below this prompt.
Get your transcript from Kapwing in Subtitles > Download. Ideally as .txt but .srt will also work.
In this example I feed in a 3 minute video about content repurposing.
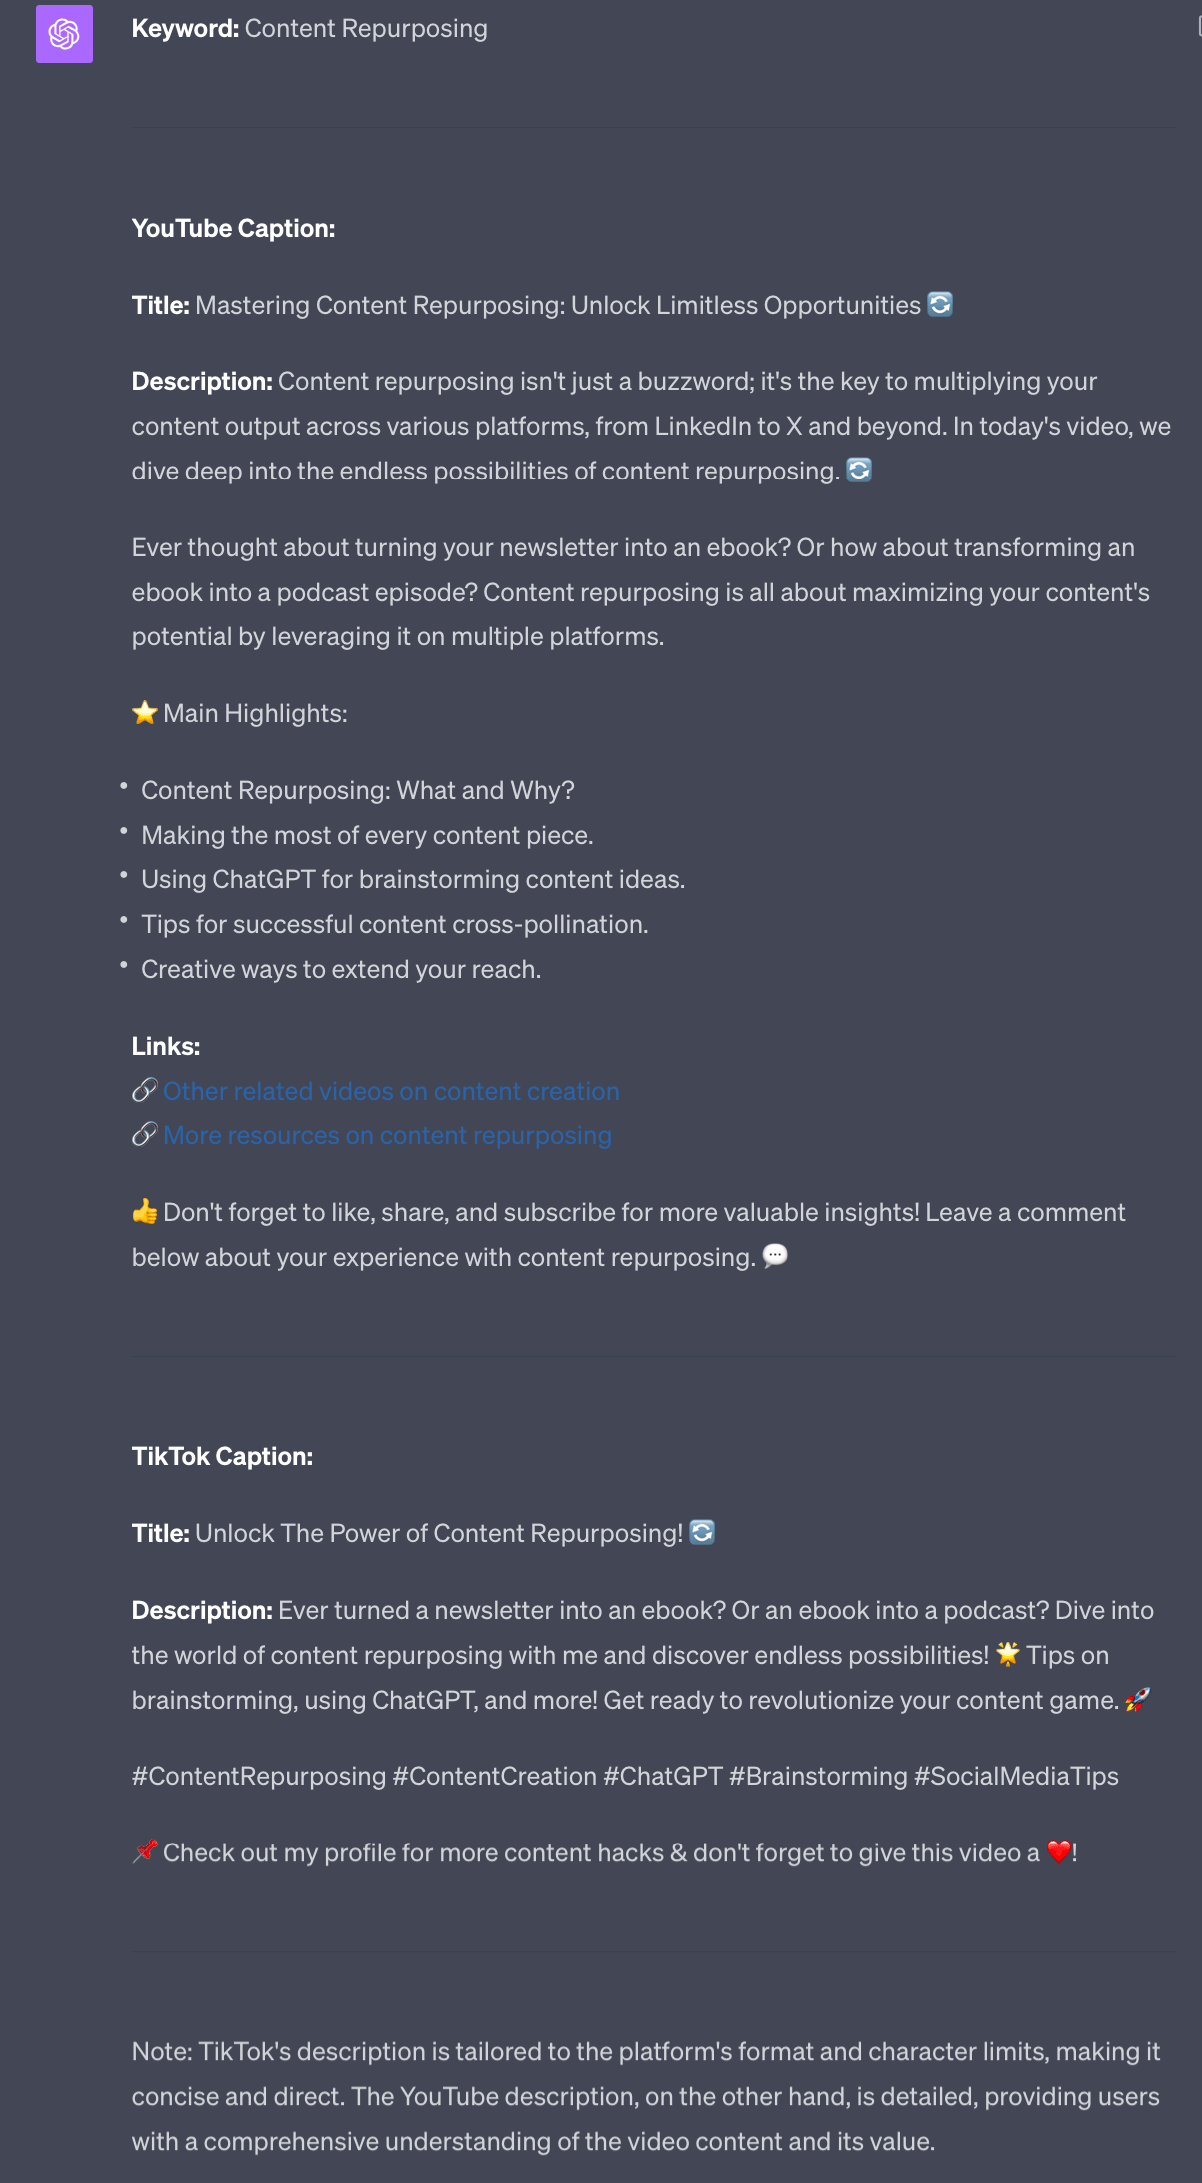
Want to add more formats? Not a problem.
My recommendation here is to go to ChatGPT and ask for a set of guidelines for creating text captions.
For example : “give me best practices for LinkedIn video descriptions”.
ChatGPT will give you a set of best practices. Check they are up to date (word counts for example change often). Put these new best practices into the original prompt so that it generates for the additional platforms.
Thumbnails are the static image before someone clicks on your video.
They are primarily used on Youtube but some other platforms support them. They are less important on platforms like TikTok and Instagram because videos just start playing automatically.
A winning thumbnail on Youtube can make or break a video’s performance so make sure to spend some time crafting one.
The easiest tool for making thumbnails is Canva.
They’ve recently introduced an AI tool that let’s you do a first draft in seconds:
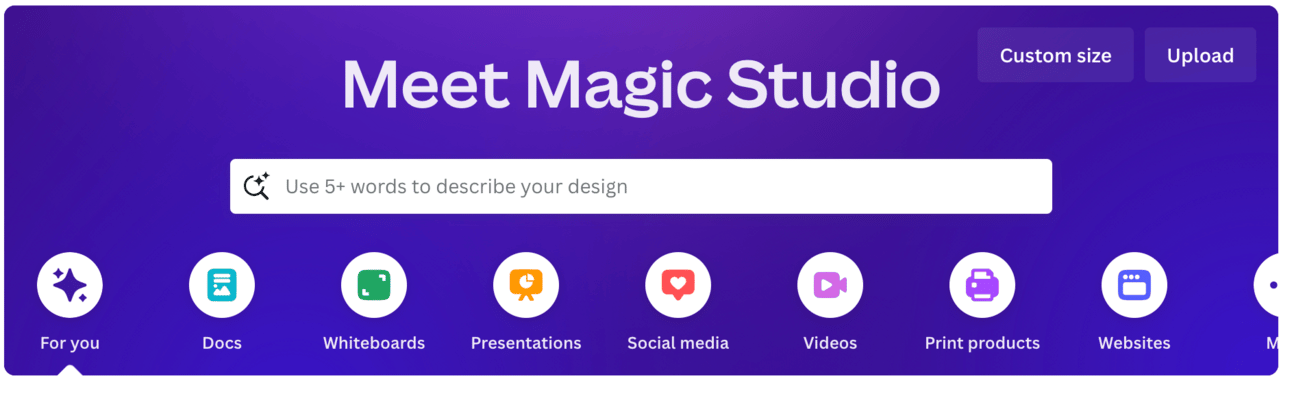
With this I can type in the design I need. If I put in “Youtube thumbnail for a video about content repurposing using AI” for example I’m given around 10 designs like this:

Perfectly serviceable but a bit generic. You can then go from the basic template though and adjust it to make it more unique.
Once you’ve found a basic design you like you can edit, adding personality and your own brand.
For example I’d definitely want to replace the generic image with something more fun.
Dalle3 is perfect here - it’s available in the paid version of Chat GPT.
The main limit for your graphics is imagination at this point. But if you want a place to start you can take your Youtube description from the last step and plug it into Dalle3 with the instructions “make a Youtube thumbnail from this video description”.
Using the video description from the last step I get these designs:
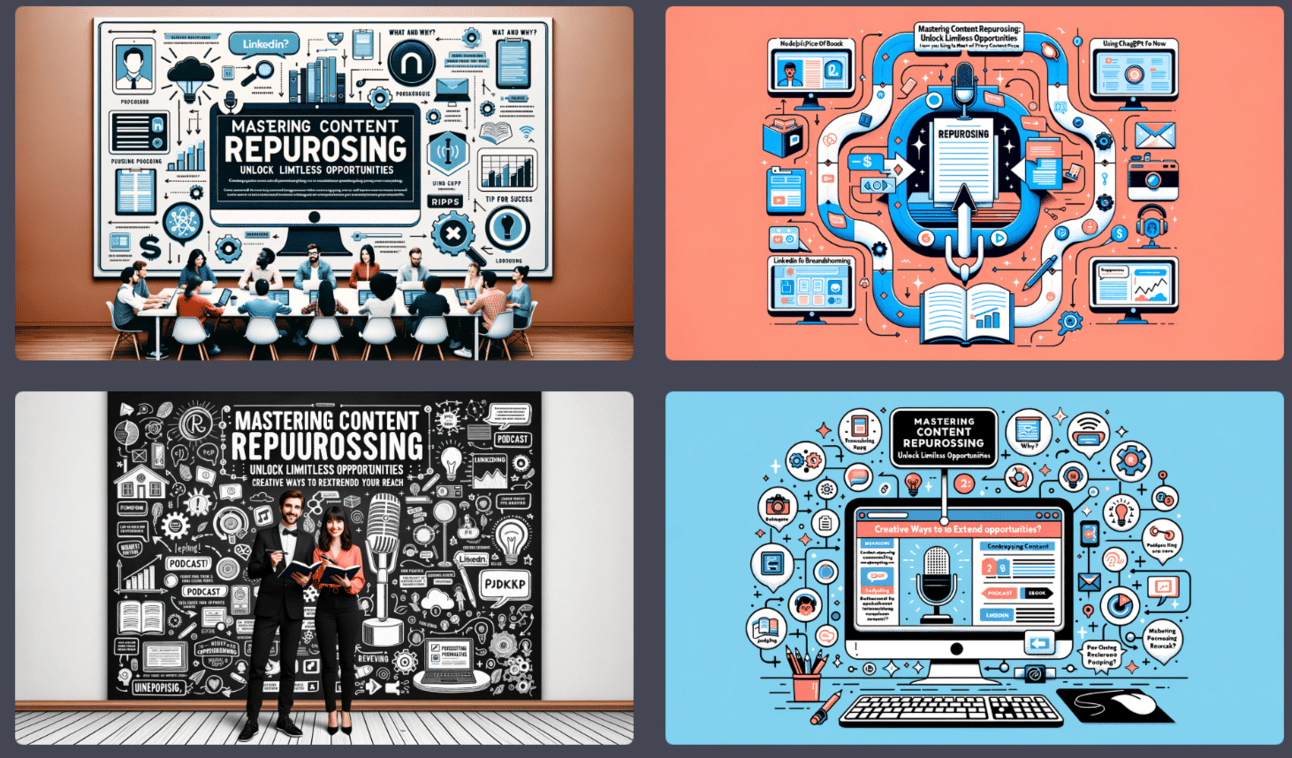
I can then combine these more unique looking graphics with the Canva templates:
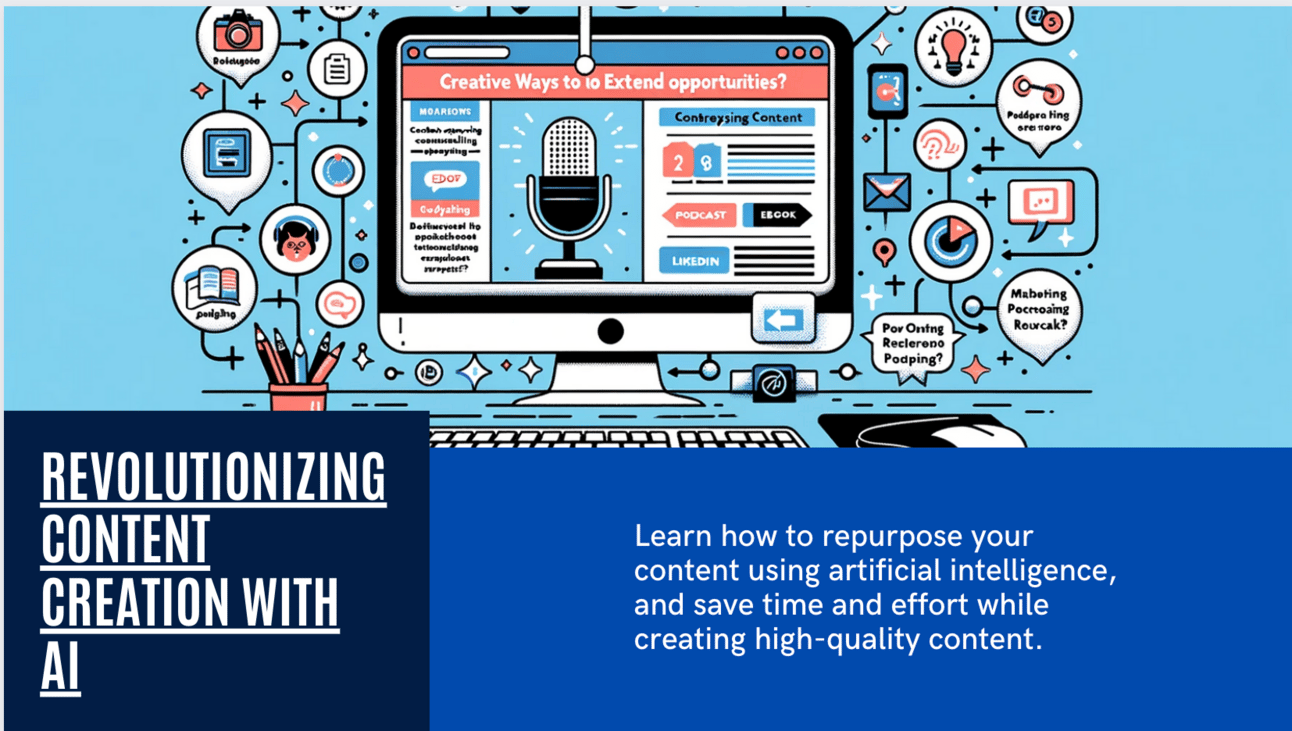
From here you’d adjust elements to fit your brand and make it “your own”. Aim for consistency across your thumbnails so that you can build up a brand. When people see your thumbnail they should immediately know it’s you.
Once you have your video, your caption and your thumbnail you are ready to publish.
How you publish exactly depends on the platform - generally once logged in there will be a large + or Upload button visible in the interface. Hit that and run through the process. Google the steps if still lost.
You can upload natively on the app (on your phone in the case of TikTok for example) or use scheduling tools like Hootsuite, Buffer, Hypefury etc.
I’d recommend starting with manual on each platform initially and once comfortable and seeing results work on automation and scheduling.
What now?
Your first video will be seen by maybe 1-2 people. Don’t worry. That’s natural! Don’t be discouraged.
All platforms want to see you posting consistently before they’ll send you traffic. Keep posting regardless of if anyone is watching and eventually you’ll start to see visits, views and engagement.
How long? At least 30 days. Just keep it consistent and don’t leave gaps.
Want to speed the process up a bit? Look into boosts - most platforms have the option to add $5-10 to a post to get it shown to people. You are running a business here so consider this an investment.
This has the secondary psychological effect of making your work seem worthwhile. It can be very disheartening to post for weeks and nobody watches anything! Just by having some activity and interaction from boosts you’ll enjoy the process more and be more likely to stick at it and be consistent.
Thumbnails are critical in getting your video viewed on Youtube. Here’s a nice little tip for improving yours.
Use GPT-4’s visual mode to analyse and provide feedback on your thumbnails.
Head into GPT-4 default mode. There will be an upload image button next to the main chat box. Alternatively just drag and drop your thumbnail image into Chat GPT.
Then use this prompt:
Provide feedback about this Youtube thumbnail. The focus is on click through rate.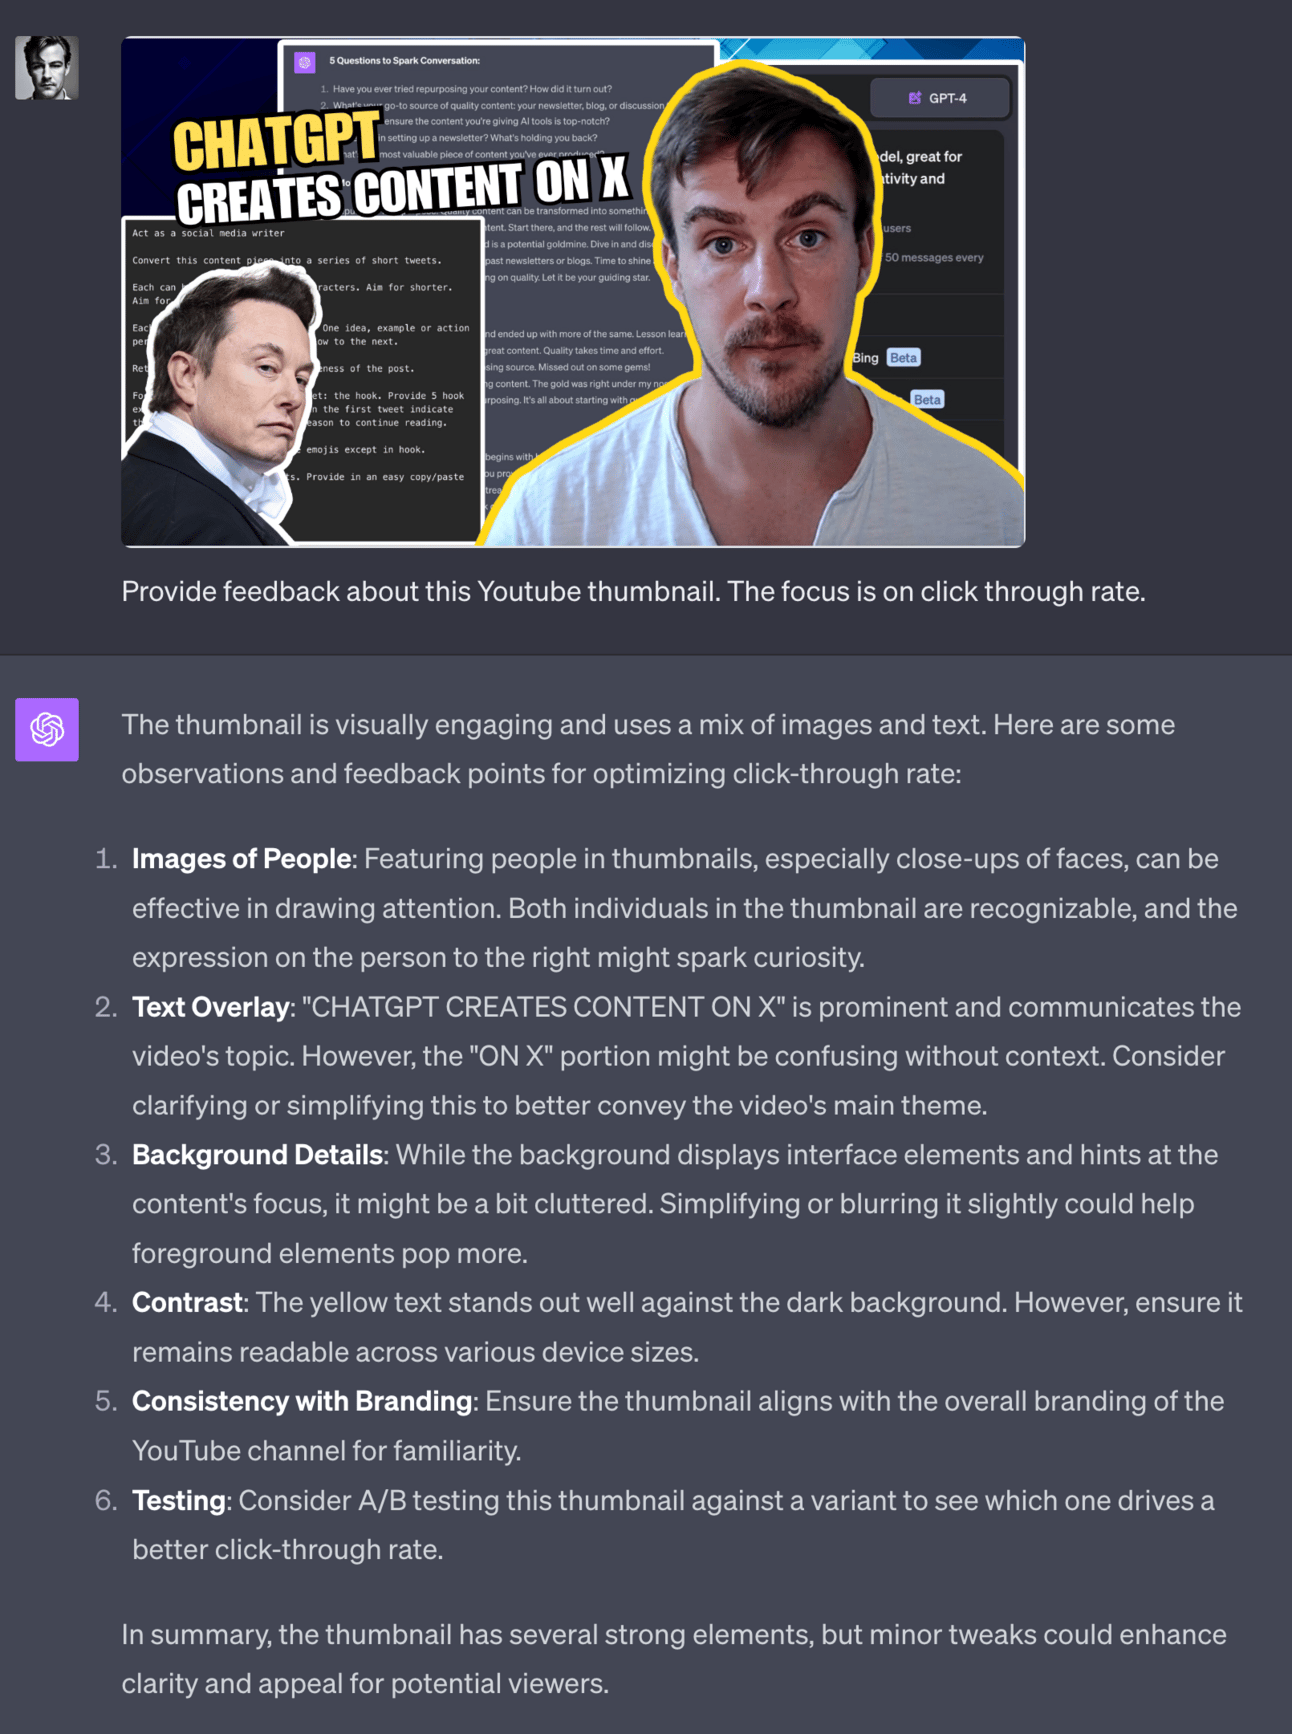
ChatGPT will visually analyse the image and, based on what it knows about thumbnails, provide some feedback for you to implement.
Very cool!
Also: as a member of the Community please share your thumbnails for more constructive feedback. The more you get the better your thumbnails will be!
You’ve now come through the whole process of scripting, filming, editing and publishing video content onto social media.
We’ve covered a lot and right now it may feel overwhelming. However, the detailed approach we’ve covered is there to give you all the steps you need. Once you’ve worked through this process and produced your first few videos it’ll become automatic.
Best of luck on your video journey and make sure to share your content with me in the Community or on X!
A reminder of what we have covered this week :
Part 1: Creating Video Scripts
Part 2: Recording High-Quality Video
Part 3: Rapid video editing
Part 4: Multi-Purposing Content
Part 5: Publishing and Promoting Video
See you tomorrow Prompt Entrepreneur!
Until then, keep PROMPTING!
Kyle
Unlock the power of AI to transform your video content creation process with our comprehensive playbook, '▶️ Create Video Content with AI | Prompt Playbook'. This guide is meticulously designed to empower you to leverage long-form written content into engaging video scripts, high-quality recordings, and impactful promotions. By mastering these skills, you'll not only enhance your content marketing strategy but also elevate your brand’s visibility and audience engagement through effective video storytelling. Dive into a structured approach that covers everything from scripting to publishing, ensuring you can create professional videos that resonate with your audience. Whether you're a seasoned content creator or just starting out, this playbook will equip you with the tools and techniques to harness AI for rapid video production, making it easier than ever to share your message across various platforms.
This playbook is tailored for content creators, marketers, and entrepreneurs looking to elevate their video marketing game. If you're struggling with the overwhelming task of turning written content into videos, or if you're new to video production and unsure where to start, this guide is perfect for you. It addresses your challenges by providing clear, actionable steps backed by AI technology, enabling you to create engaging video content without the usual stress and time commitment. Whether you're a freelancer aiming to diversify your offerings or a business owner seeking to enhance your brand's visibility, this playbook will help you overcome common barriers to video content creation. With its straightforward approach, you'll be empowered to produce videos that not only inform but also connect with your audience authentically.
No prior experience is necessary. This playbook is designed for beginners and seasoned creators alike, providing step-by-step guidance.
While individual timelines may vary, the playbook includes strategies to streamline the process, allowing you to create your first video in as little as a few hours.
You'll need basic recording equipment (like a smartphone or webcam) and access to AI tools for editing and script generation, which are explained within the playbook.
Absolutely! The strategies outlined can be adapted for various formats, including tutorials, vlogs, promotional videos, and more.
Yes, it includes best practices for optimizing your video content for search engines, helping to increase visibility and engagement.