
AI Business
Unlock the potential of artificial intelligence in product development with our comprehensive playbook, '📦 Building Digital Products with AI | Prompt Playbook.' This guide will take you through the entire journey of creating digital products that not only meet market demands but also resonate with your audience.
Start ReadingIn the last Part we ended up with a list of different digital products that we can stack together into tiered packages.
In this Part we’ll get into the actual production of the digital products.
We’ll be using ChatGPT for structuring our work but I still recommend using your human knowledge, skills and writing ability to make something unique and valuable to our customers.
Remember this is tier 1 - the lowest cost, lowest sales friction products. We want these products to shine so that customers will want more!
First we’re going to use ChatGPT to flesh out the products in tier 1.
Here’s a quick reminder of what our example tier 1 looks like:
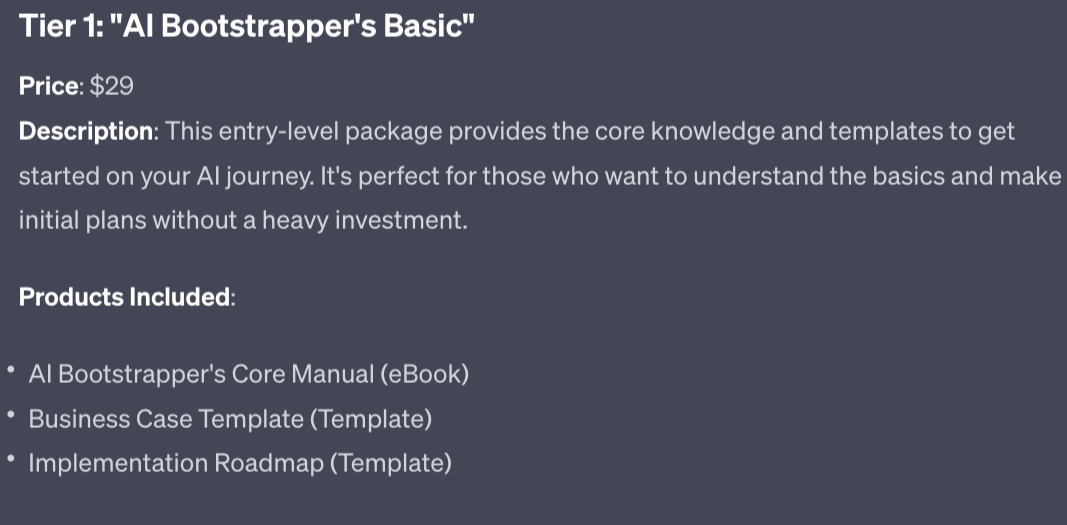
This particular digital product has 3 components - an eBook and two templates.
Your components will be different depending on your inputs in the prior Part. And of course feel free to edit and adjust what you get from ChatGPT - it works for you, not the other way around.
We are going to focus on one component (the eBook) in one tier (tier 1) in this Part. But the steps we walk through now will be relevant to all the different components, across all tiers.
Here’s a prompt to begin:
Act as an expert in the [topic] niche.

Create a [component type] structure for a product called [name of component] that is about [description].

The target audience has these problems that you should focus on solving: [problem areas]

The output should be short and digestible in one sitting and packed with actionable value for the reader.

Provide the outline along with descriptions of each element.
Draw the inputs from step 3 of Part 1 of this Playbook. For instance I’m using:
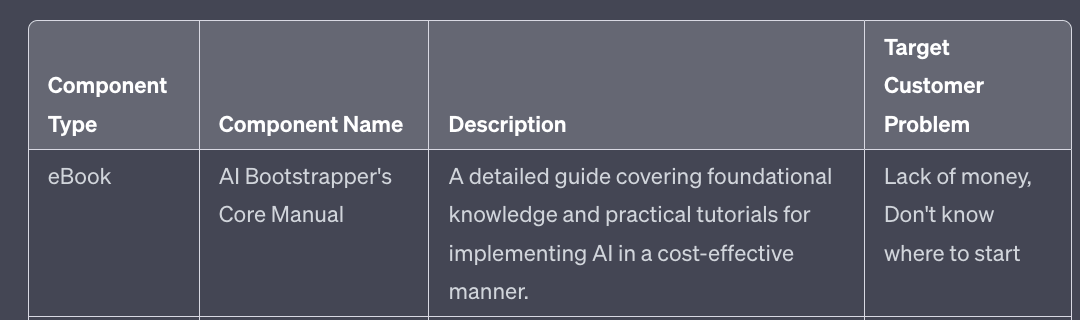
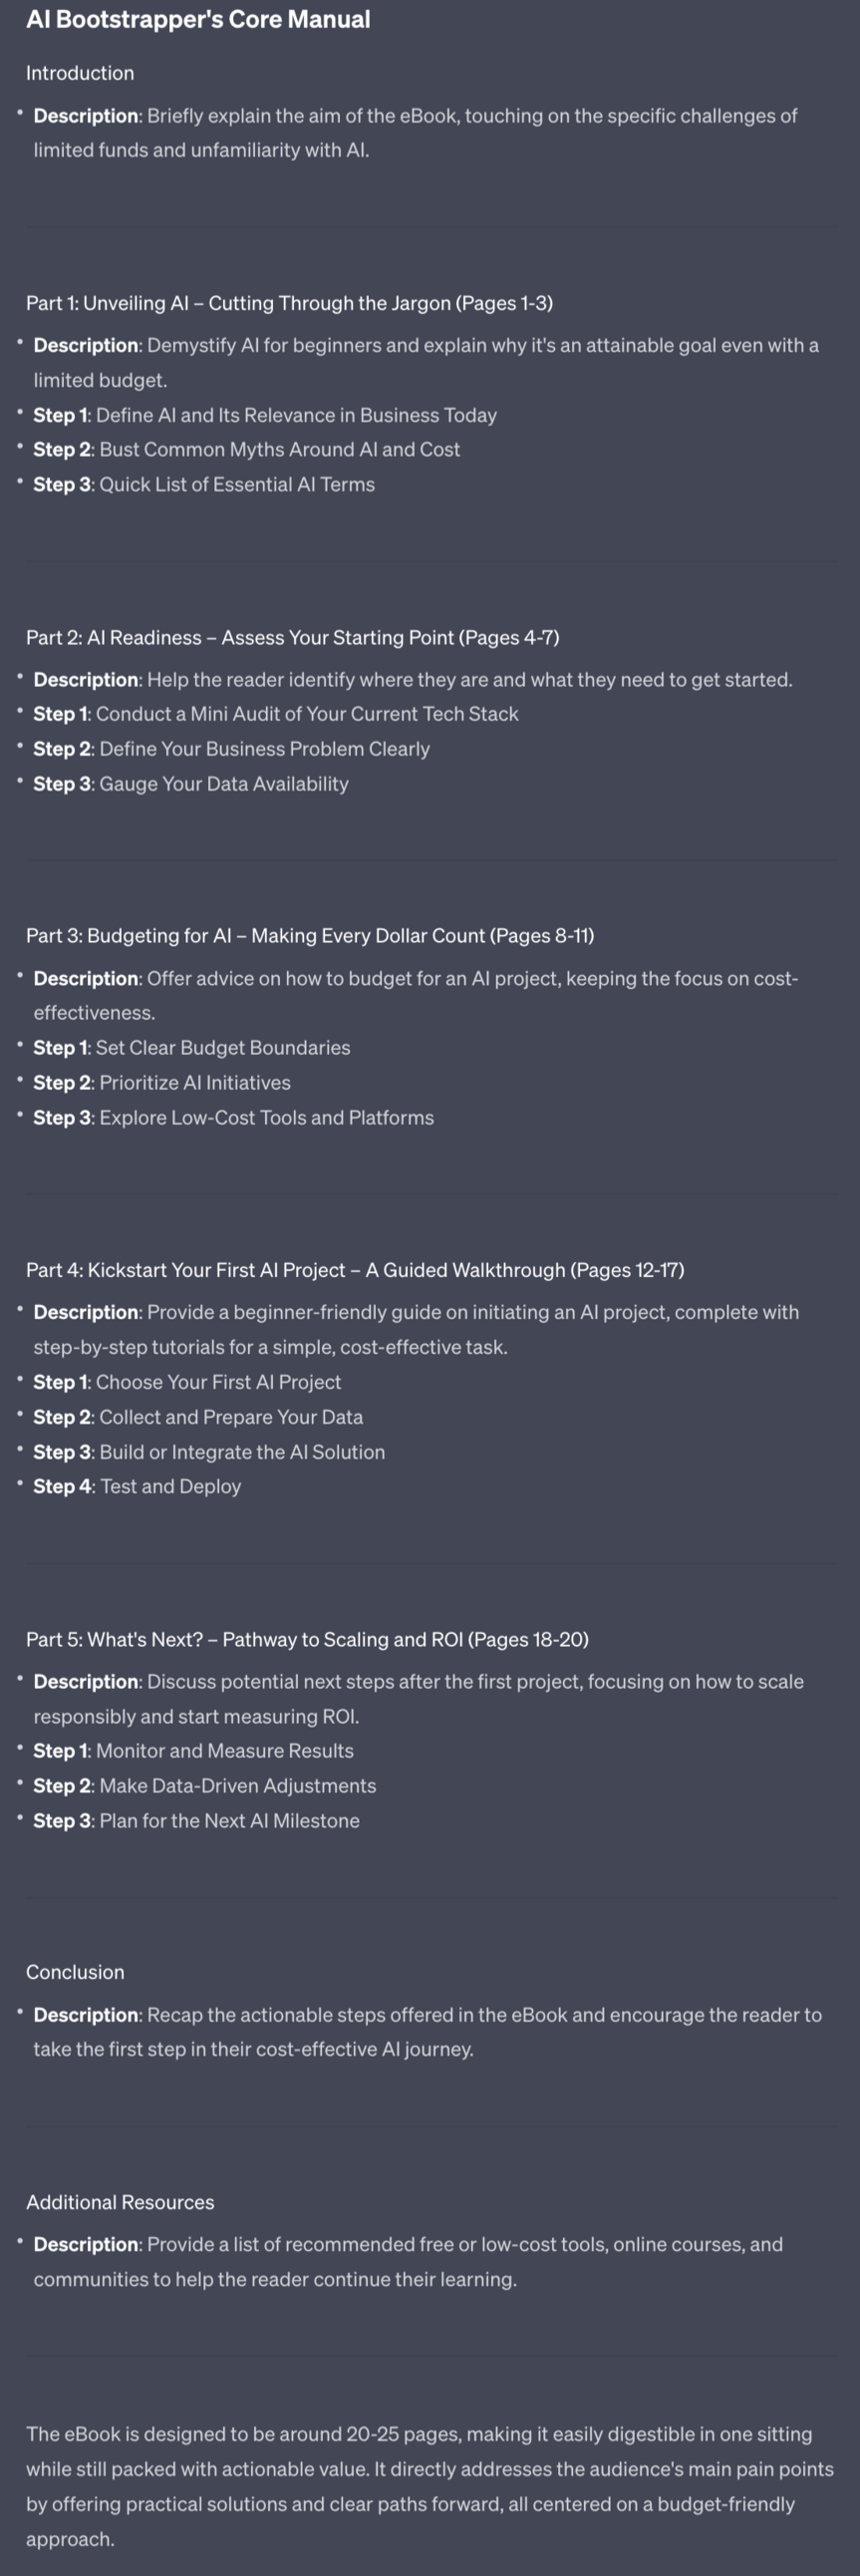
ChatGPT now structures the whole short eBook for me.
Notice I specified that the product should be digestible in one sitting - this ensures that whatever the prompt produces it’ll be short and concise.
We do not want our first product to be a 300 page eBook. Why? No-one will actually read it! Make it a short consumable guide instead.
Instead we want to keep earlier products short, easier to consume and value heavy. Later, in Part 5, we’ll look at weightier products that we can sell to customers down the line.
And if you want to specifically write an eBook there’s a whole Prompt Playbook about that: Kindle Publishing with AI.
Go ahead and edit your outline based on your own expertise.
Once you are happy with the basic shape of the product we can get ChatGPT to flesh out the content. For this particular task I’d actually recommend Claude as it tends to produce better written content - if you have access try to both and see which generates better results for you.
Under the existing outputted structure use this simple prompt:
Act as an expert writer in the niche: [topic]

Using the outline above provide me with a full version of Part [#]

Provide sufficient detail to fill the suggested page count.

Focus on readability and making the advice actionable. 
This is just step 1 of Part 1 - the full output was much longer and I’ve shortened for brevity.
Continue to generate your full text, part by part.
The reason for doing individual parts of the text is that ChatGPT struggles with longer outputs and will tend to truncate results. Otherwise we could just say “generate the whole thing”!
The output will be full of structured headings that borrow from the prompts - for example in the above “actionable takeaway” comes from the fact that I specified the output should be actionable. You will likely want to change these to something more natural.
As with all AI writing make sure to rewrite. Consider this a first draft for you to start working from - not the final draft ready to publish!
Speaking of publishing - how do we capture all this information into a product?
You can package up your products in a number of ways - putting them on a membership site, making them into PDFs, epub, .doc files etc.
There’s a huge potential range of options. What I’ll be showing you is the way I personally do it and also what I think is the simplest and easiest method.
I say this as someone who has deployed full eCommerce solutions - doing so would be overkill. We need something fast and lightweight.
Once you are making sales you can look at other formats and sales methods. Right now keep it simple and maintain momentum.
We’re going to build our products in Notion and publish using Gumroad. I’ll cover Gumroad tomorrow. For now let’s get started with Notion.
Here is an example of what a Notion product will look like:
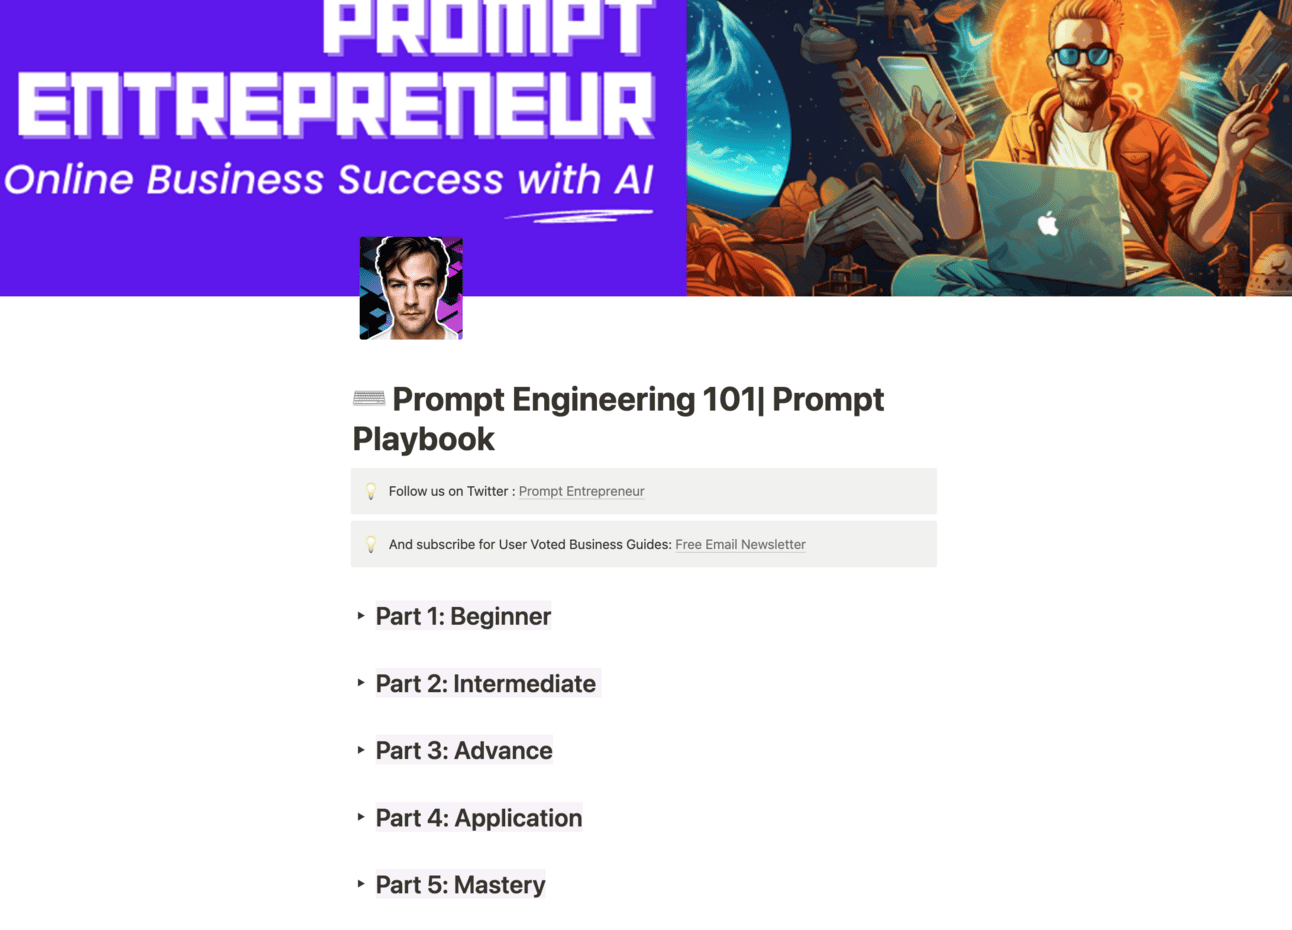
And here’s a link to a live version so you can get an idea of how it feels:
If you are happy with the look and feel of Notion then here’s how to get stated.
First up go and get a Notion account. It’s free. You can register here: https://www.notion.so/signup
Notion is available in your browser, on your phone or via a downloadable app on your computer. I use all three.
For this task I recommend the downloadable desktop app as the best place to work.
Once you have an account and the app go ahead and create a new Page either by clicking the + in the sidebar or typing cmd/ctrl + N.
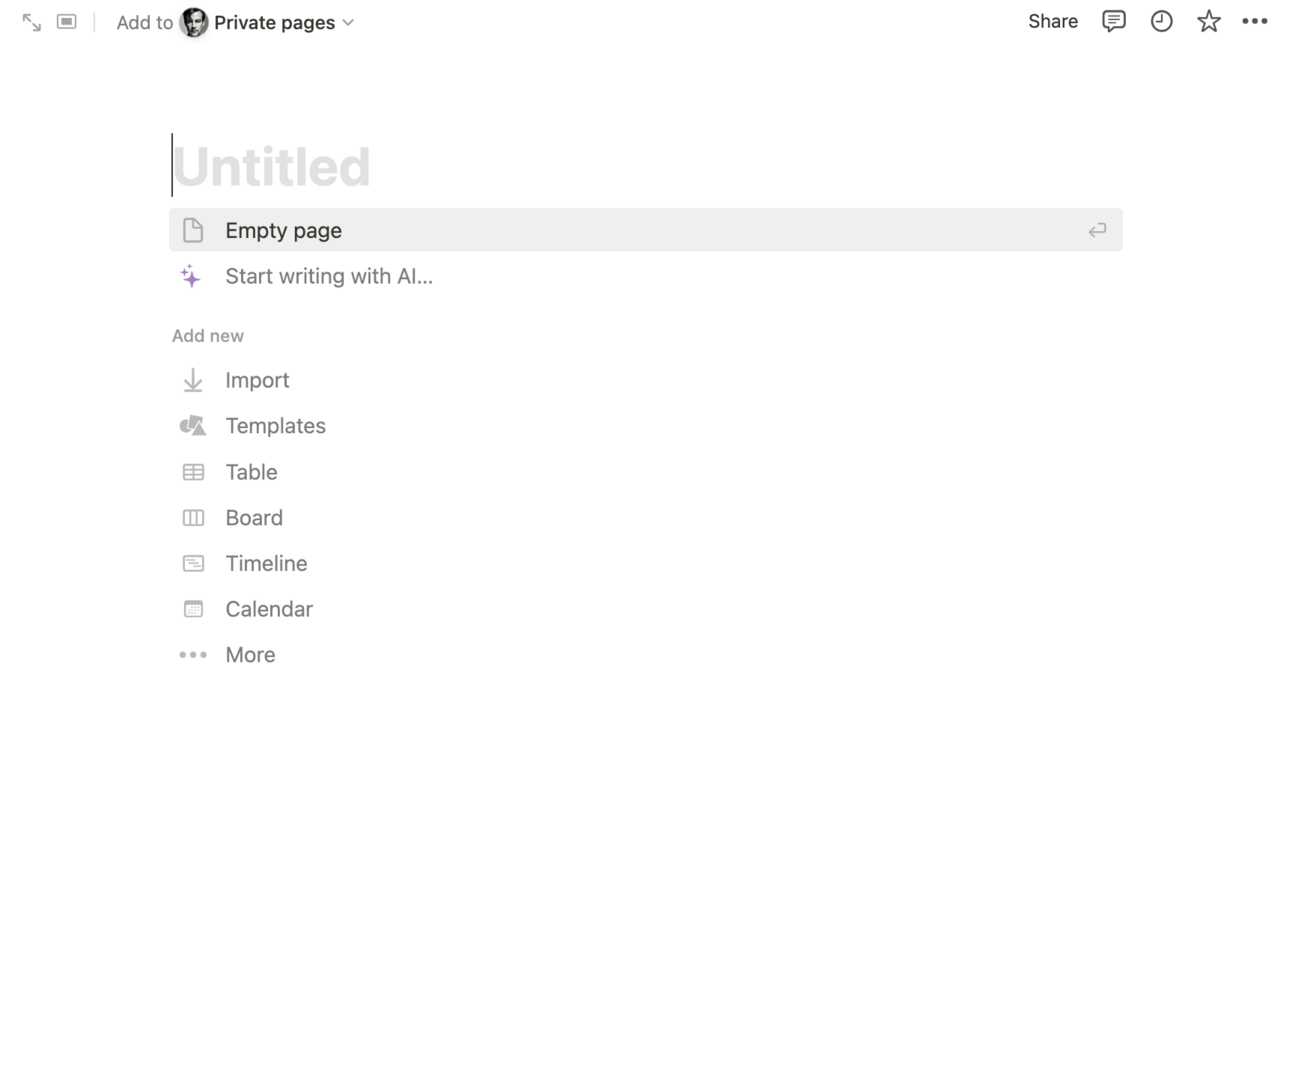
The interface itself is very similar to Word or any other word processor.
Give the document a name (your product name) and start to copy paste all the text over from ChatGPT.
You’ll notice ChatGPT’s formatting isn’t great - you’ll need to adjust the headings yourself.
Do so by clicking on the dots next to any element (header, text etc.) and selecting Turn Into.
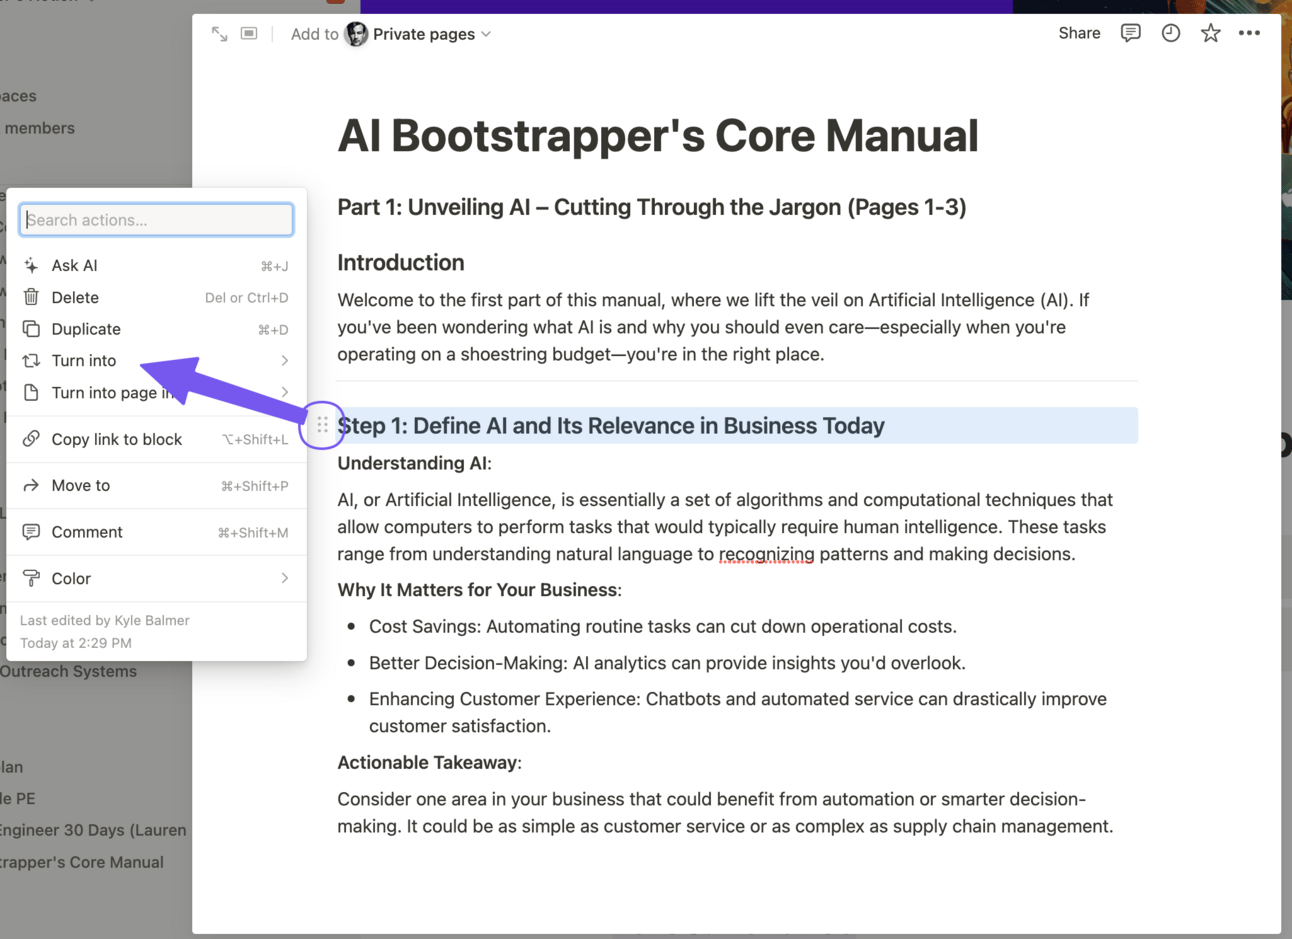
Turn Into allows you to change any element in Notion into something else - text, a header, bullet point or even another page (creating a new page and adding a link).
Just work through and rewrite and reformat all your text to your liking.
Feel free to add screenshots and graphics if relevant. Canva is always your friend for creating graphics.
Once you are happy with the product you can publish. This is where Notion is very handy - we can publish directly to the web without having to have a website.
Click Share, tab to Publish and then click Publish to Web:
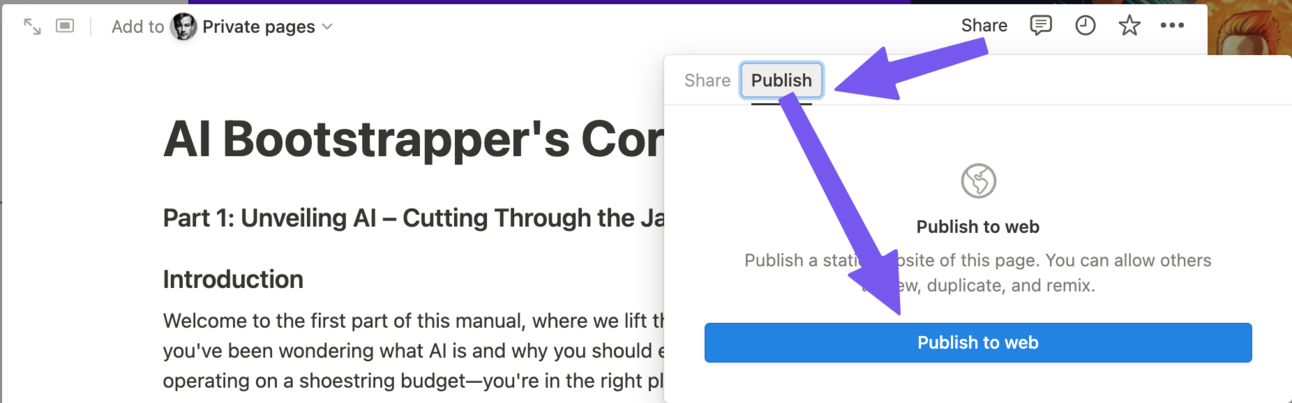
This will publish to the internet and make it publicly available to anyone who has the link. They do not need to have a Notion account to access your document.
You can also adjust the privacy settings:
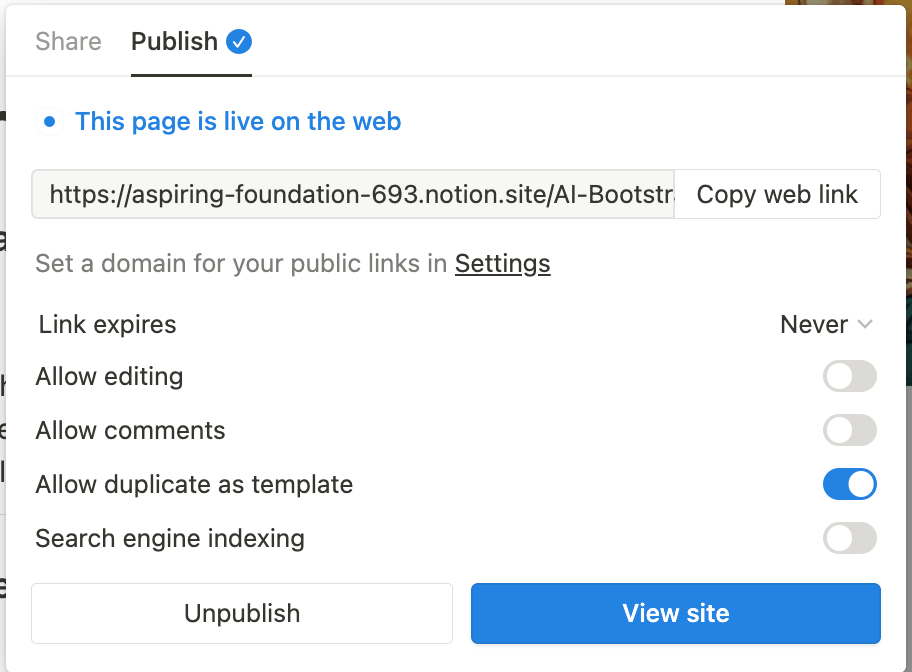
These are my settings for most products.
You might want to turn off “allow duplicate as template” to stop people making local copies too. That’s up to you. If it’s a calculator, spreadsheet or similar tool where the user needs to enter information then make sure to allow them to make duplicates.
In the next Part I’ll show you how to sell this Notion document using Gumroad.
Subscribe to the Premium Membership to read today’s Premium Prompt.
Following these steps you should now have your first basic product. Continue to create all the individual components until you have the whole package ready.
It’s important to keep early (tier 1) products as simple as possible. Do not write a full book. Do not record a full video course. Do not code a full tool.
We want initial products to be lightweight and fast so that we can launch as many as possible as quickly as possible.
This allows us to see what resonates and what does not. Once we’ve got a hit on our hands we’ll expand it.
In the next Part we set up our shop and prepare our first product for launch.
A reminder of this week:
Part 1: Plan your digital product
Part 2: Build your digital product
Part 3: Set up shop
Part 4: Market your digital product
Part 5: Expanding your product range
See you tomorrow Prompt Entrepreneur!
Until then, keep PROMPTING!
Kyle
The trade-off is that as their fee they take 10% of every sale. Chunky!
However, for getting started Gumroad is fine. Once you are generating revenue you can justify looking at a different payment solution such as building your own eCom functionality on your website.
Right now though we want speed and simplicity.
Once you’ve set up a free account go ahead and work through the setup checklist. It’s all self-explanatory so I won’t waste your time going through it here.
The only hiccup may be payment processor. This is how Gumroad sends you the money from your sales.
You can either give:
bank details
Stripe account
PayPal account
Personally I prefer Stripe but how you get paid is up to you and will depend on what’s available in your country.
Once you’ve got a live Gumroad account up and running we can start adding products.
In the Products tab hit "New Product” and you’ll get this screen:
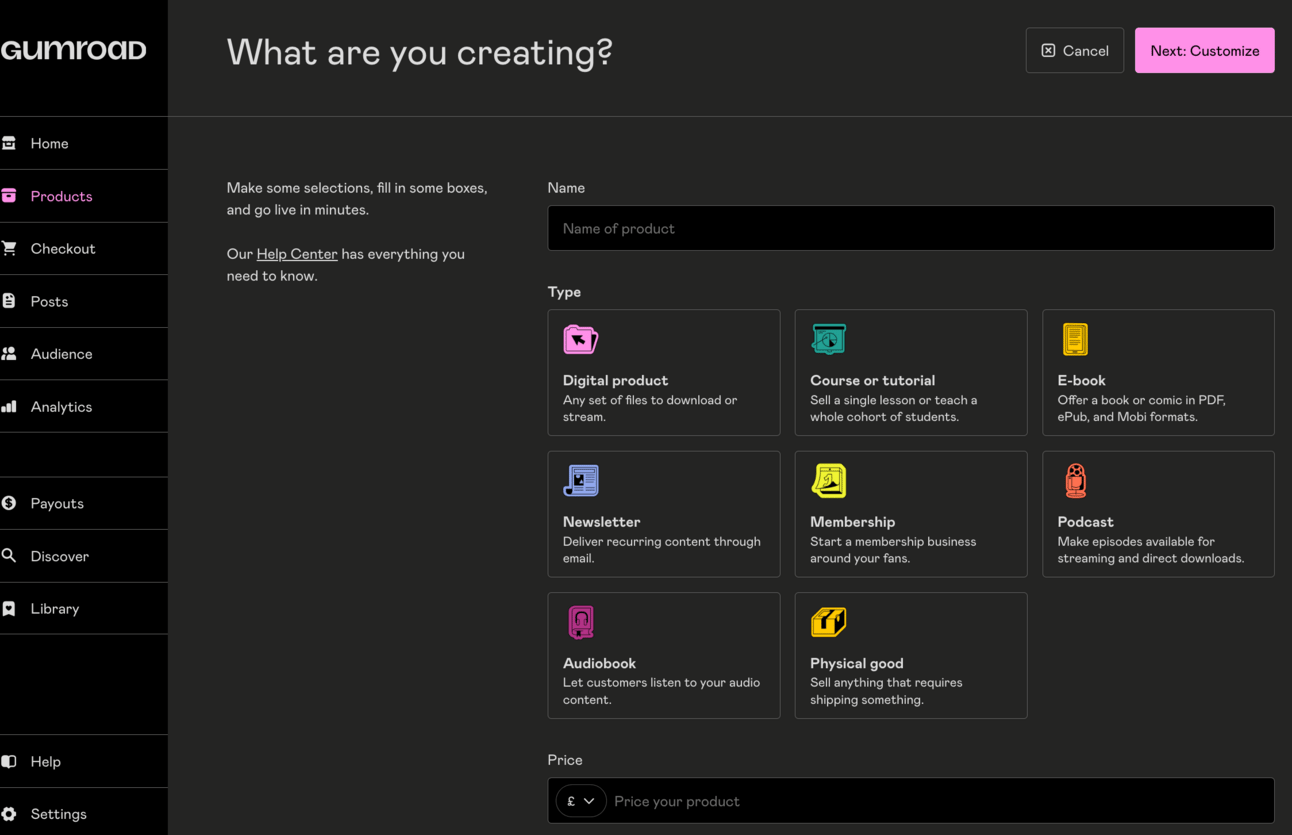
Our product name will be the overall name of the product - not the names of the Tiers.
So in the examples we’ve been using my product name is “AI Bootstrapper’s Bible” and the tiers are:
AI Bootstrapper’s Basic
AI Bootstrapper’s Pro
AI Bootstrapper’s Complete
We’ll add the tiers later. For now product name is just “AI Bootstrapper’s Bible”
You’ll also need to select the type of product.
Most of the time this is going to be Digital Product. Why? Because in the last Part we built our product in Notion - we’re just using Gumroad to sell access to that Notion link. This will be clearer as we move ahead.
For the price set the price of the first tier. In my example the prices were $29, $79, $149. So I just add $29 in this first product setup stage.
To flesh out the product so it’s ready for sale we’ll need:
Description
Images
Contents
The rest of this Part will be mainly concerned with filling in these details with the help of AI.
The description is the most important part of our Gumtree product. It’s our main area for getting across what the product is and why people should buy it.
Here is an example page. You’ll see that the description (bottom left, going down the page) takes up a large prominent part of the page:
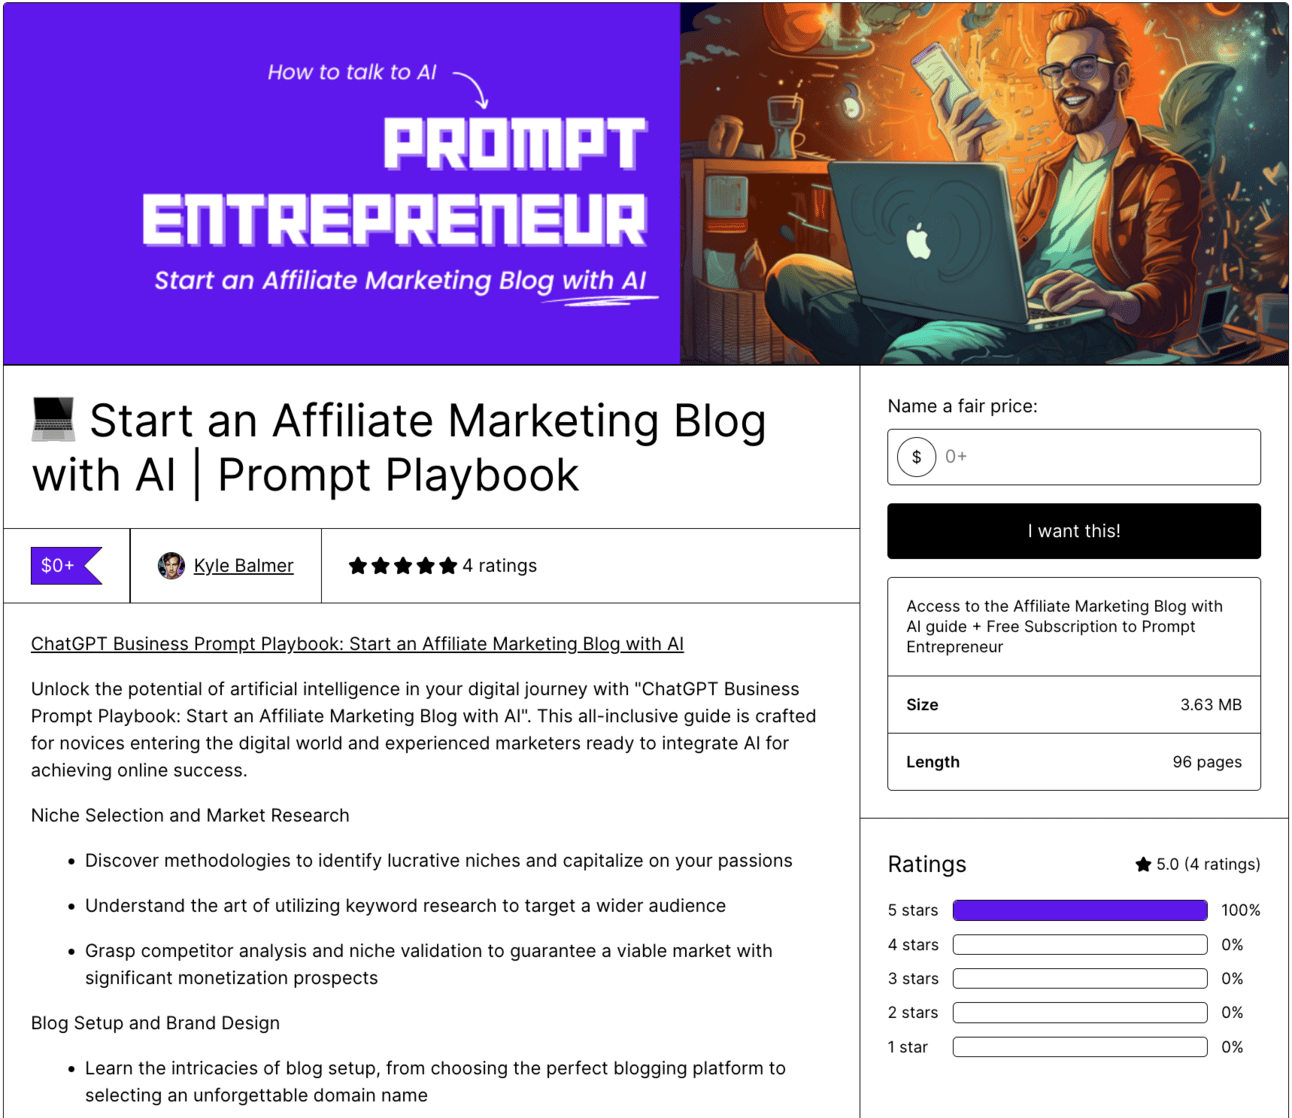
This is where we add our copy to make the sale.
To do so upload your product file into GPT-4’s code advanced data analysis tool or into Claude.ai.
Then use this prompt to extract and draft a description:
Act as an expert copywriter.

Analyse the text of this product and write a description for a product sales page.

Provide a content overview, detailed structure of the content, benefits, features and a call to action.
Do not use these headings - instead write sales copy alternatives for each section.

Mix short sentences and bullet points. Emphasise readability.
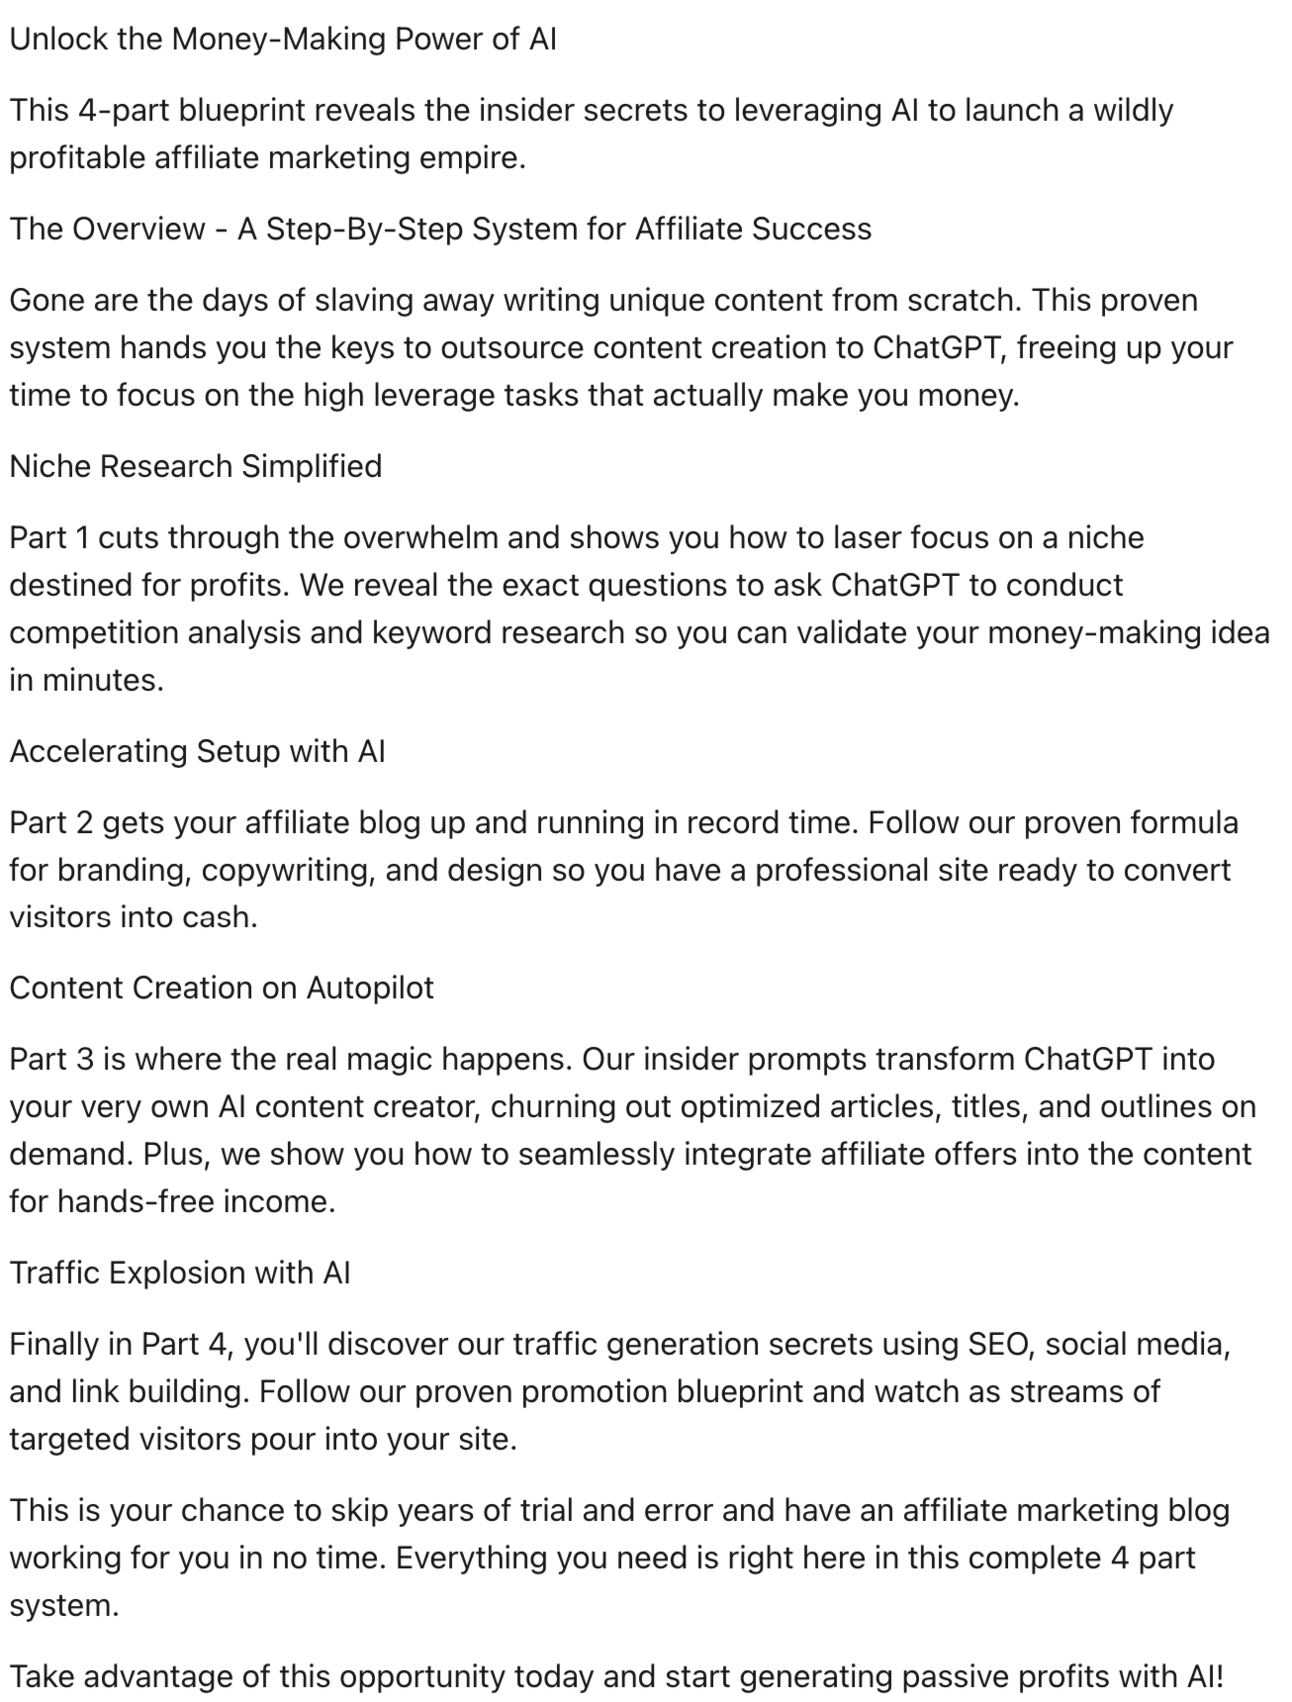
Use the product description as a jumping off point.
Also take advantage of Gumroad’s formatting tool to make headers stand out more.
We require two images for the product - the cover (header) image and a thumbnail.
The thumbnail is shown on your Gumroad store page and in Gumroad Discover (which is Gumroad’s internal marketplace). We’ll cover Discover in the next Part on marketing.
For the header image I’d recommend using Canva.
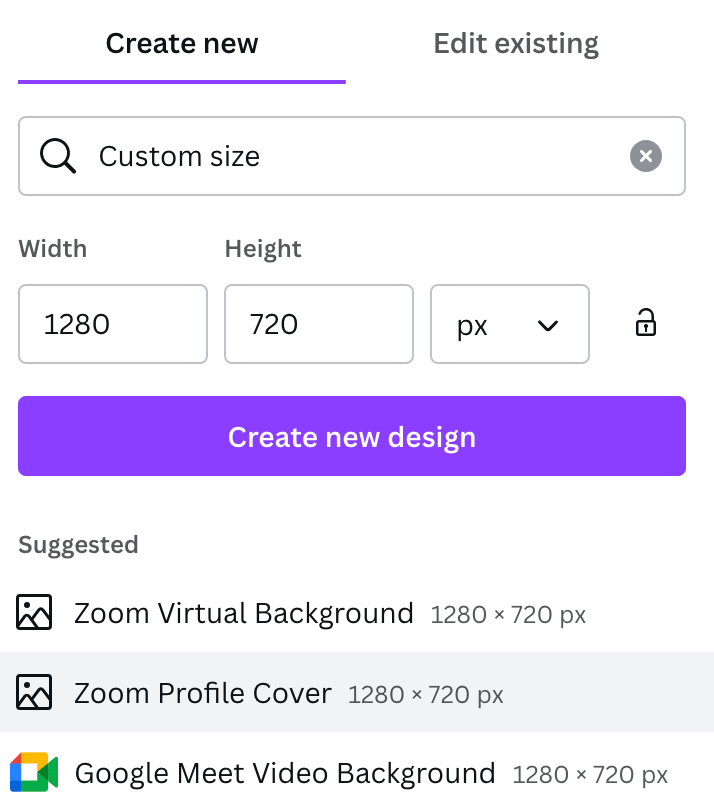
Head to Canva and create a new design. Choose custom size and enter 1280 width x 720 height:
Sadly there are no pre-built Canva templates for Gumroad.
However, if you click Create New Design then Canva will provide lots of templates that it those dimensions:
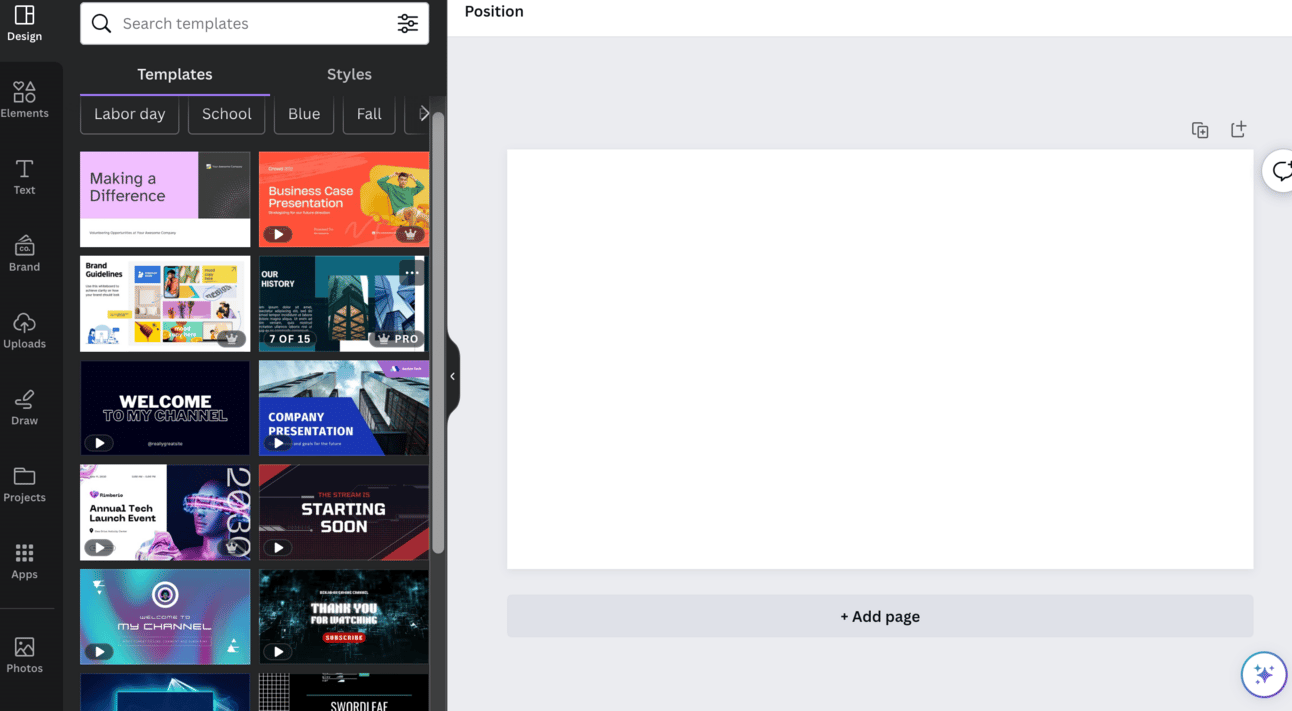
Scroll down the left hand side designs until you find something you like. Edit from there and upload as your product’s cover image.
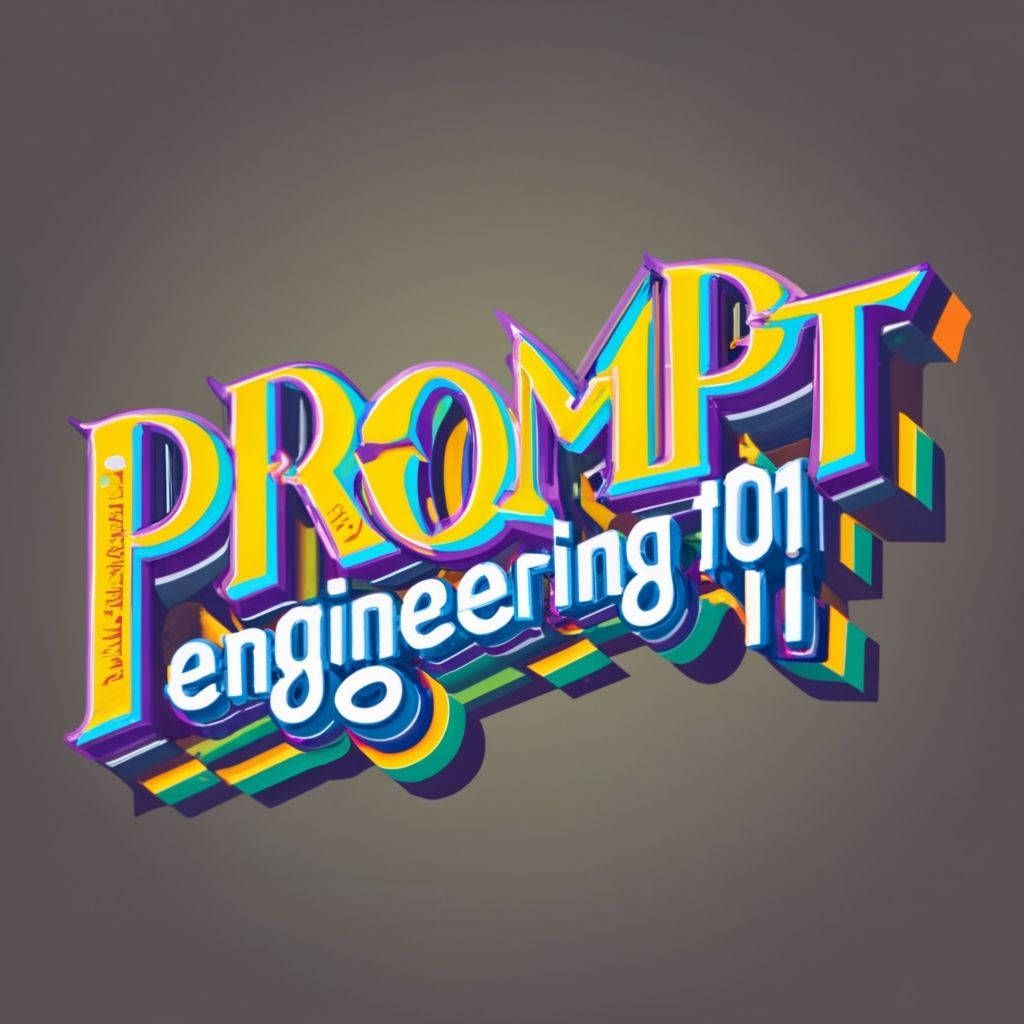
For the thumbnail we need a square image of 600 × 600. Again we can use Canva or we can use https://ideogram.ai/
Ideogram is good for the thumbnail because it can (unlike most AI image makers) generate text inside an image.
Grab a free account from ideogram.ai and use this prompt structure:
"Product Name" text. Typography. [style details]Make sure that the name of your product is in “ “.
Then add any style details you want at the end of the prompt.
This example use text = “Prompt Engineering 101” and then “Three dimensional lettering. Neon” for the [style].
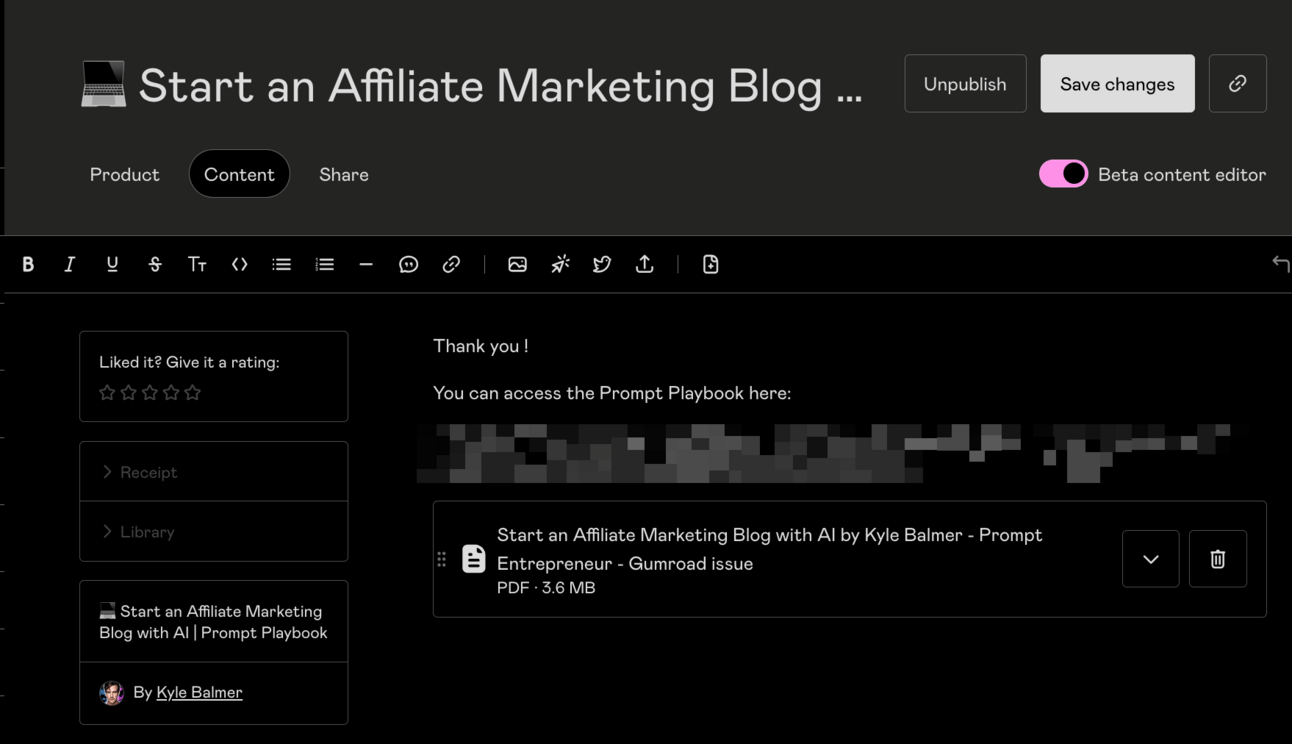
The next tab in Gumroad is for the actual product contents that are unlocked when the customer makes a purchase.
You can keep this nice and simple because we built our product in Notion previously.
All we do is have a basic welcome and thank you message followed by the link to the Notion.
Our product is now ready to be launched.
However, what about the tiers inside the product?
We’ve currently set the product up as only the lowest tier.
Remember that the idea here is to test reaction to the basic product and if it is selling well with customers we go ahead and develop the rest of the tiers.
This is to save us from too much upfront work with an uncertain reward.
We’re ready to go with just this lowest tier product - we can launch.
Alternatively we can add the other tiers and make them unavailable for now.
To do this navigate back to the Product tab and scroll down to find Versions.
Add versions for each of your tiers. Use your tier names for each new version. For the description in each add the additional items they’ll receive. And finally add the additional cost of the tier compared to the base price.
For instance if the base price of tier 1 is $29 and tier 2 is $79 then set the additional amount to $50.
Here’s the important part - set the quantity to 0.
This will make it so the details of the higher tiers are visible but no-one can purchase them. This builds FOMO - why can’t I get the best version?
To make this even more valuable scroll up to Product Info > Summary and add a line like “Premium version waitlist is now open. Email xxx@company.com to be notified when the doors open”
Subscribe to the Premium Membership to read today’s Premium Prompt.
Gumroad makes it extremely simple to launch a product.
If we were using another system then I certainly wouldn’t have been able to explain all of this in a single Part!
Remember the main thing is speed - we want to launch products and see what works best. So don’t get too caught up here. Keep momentum and moving forward.
In the next Part we’re going to open the doors and start making sales.
A reminder of this week:
Part 1: Plan your digital product
Part 2: Build your digital product
Part 3: Set up shop
Part 4: Market your digital product
Part 5: Expanding your product range
See you tomorrow Prompt Entrepreneur!
Until then, keep PROMPTING!
Kyle
In this Part we’re going to market and launch our product.
Making your first sale is a big deal in any online business.
In this Part we’ll look at a number of strategies for launching.
First up is a nice easy win.
Gumroad has its own marketplae where people can find and buy products.
Here’s a breakdown of one of my recent products:
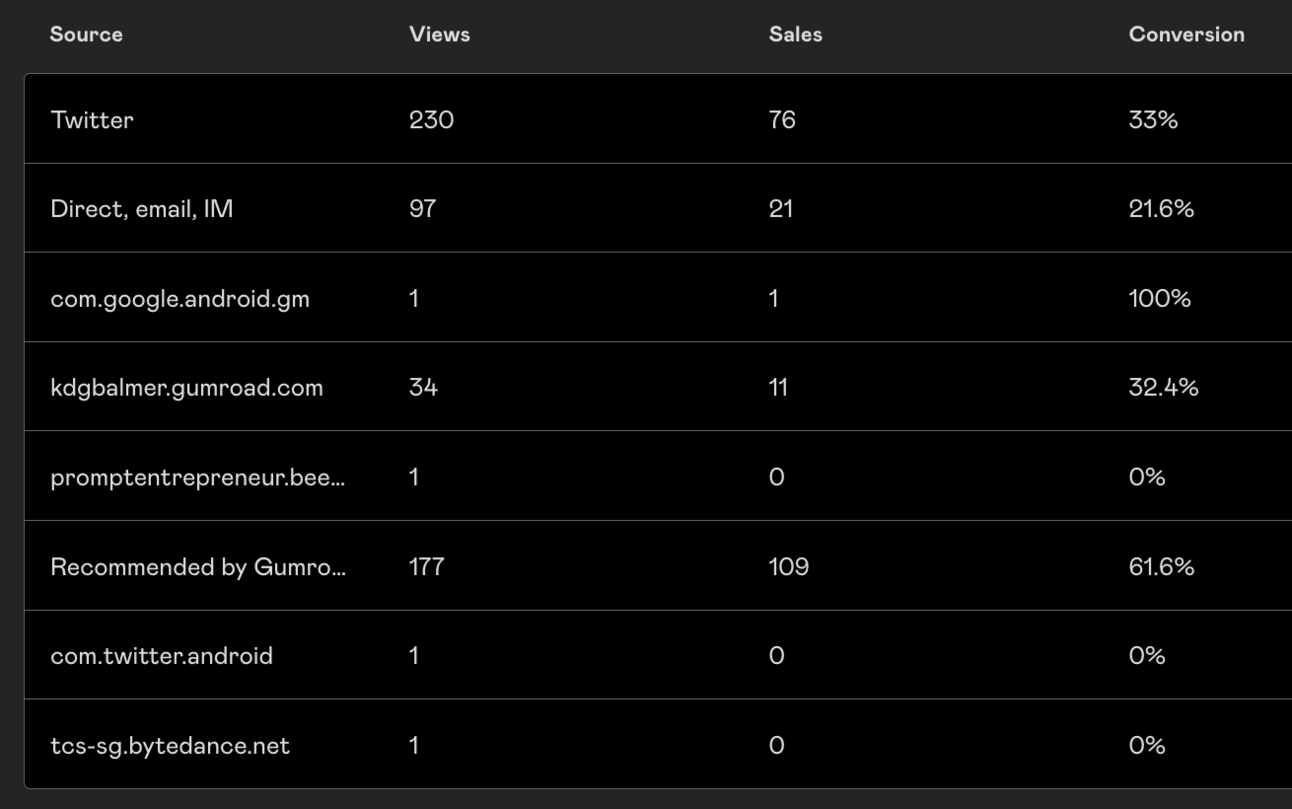
Most traffic (230 views, 76 sales, 33% conversion) comes from Twitter/X which is not too surprising.
Further down "Recommended by Gumroad” is from Gumroad Discover.
That’s the second highest traffic channel with 177 views and 109 sales. Note also the high conversion at 61.6%.
Whilst Discover shouldn’t be your primary channel it’s definitely worth setting up for free traffic and sales.
Doing so is nice and simple.
In your product listing go to Share:
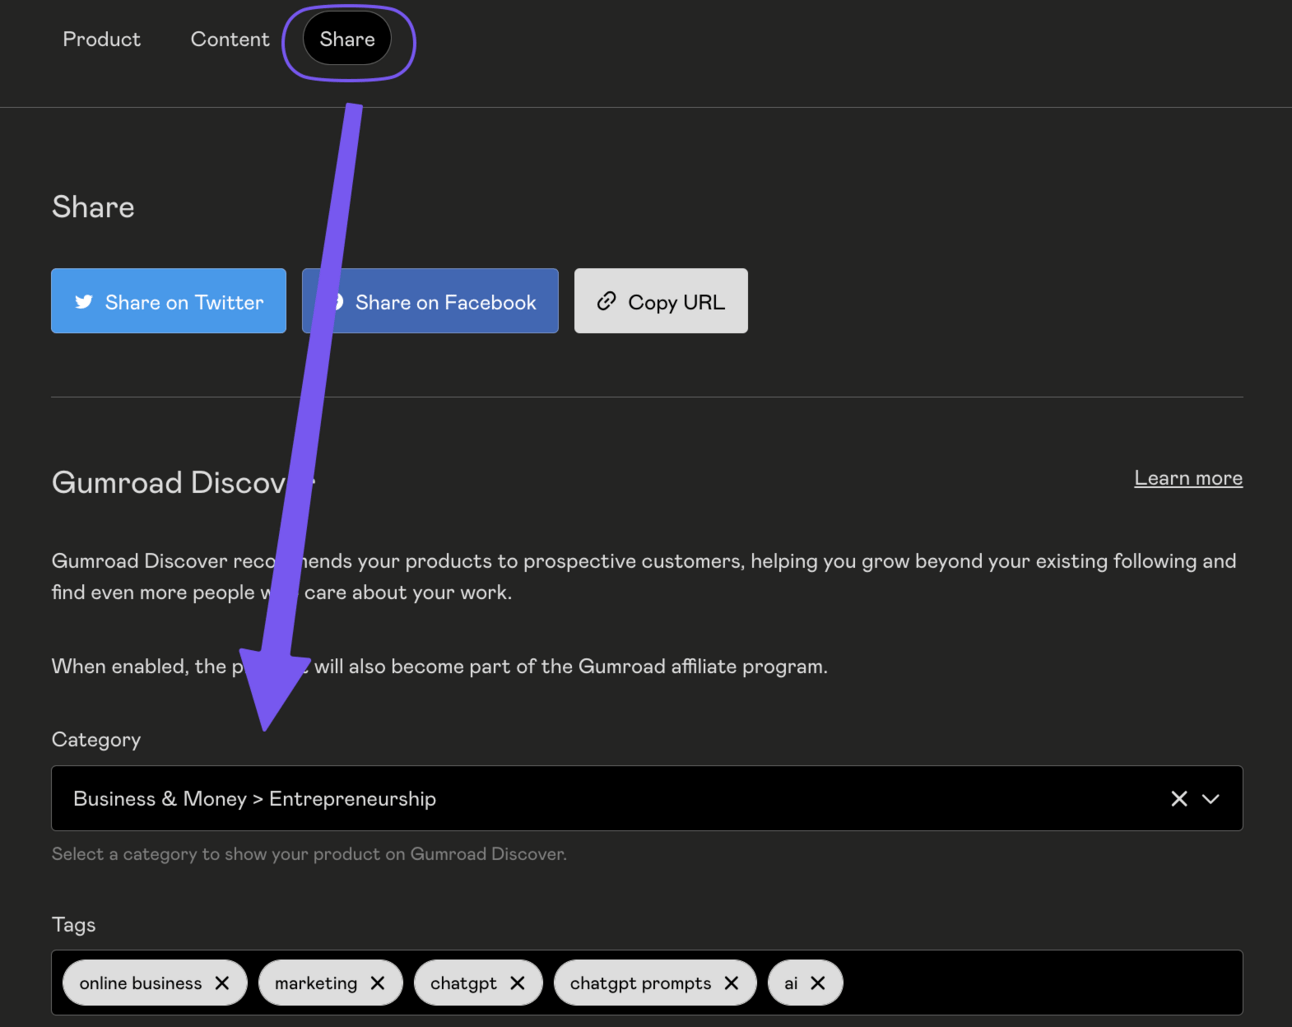
From here you can set the category and tags.
To get good categories and tags go to https://discover.gumroad.com/
For categories just browse using the top and side menu until you find a category that has similar products to yours. They should be similar topics, length and price if possible.
Once you’ve found your category check the top of the page. There will be a list of popular tags like this:

Go ahead and grab these tags.
If you can’t find your category try using search instead. Put in keywords connected to your product and see what comes up. Then locate what categories they are in.
Also in search check the left sidebar for tags:
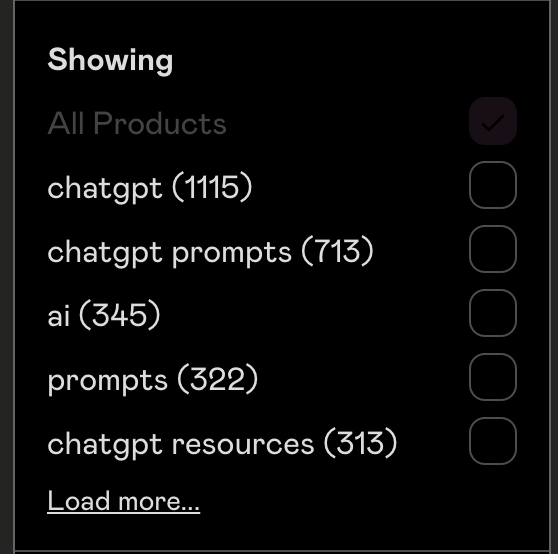
Once you’ve set the category and tags your product will be visible on Discover. That’s step one.
But we also want to increase its visibility.
We do this by basically making Gumroad our affiliate - ie. we pay Gumroad a percentage of the product price in return for them featuring it!
Scroll down on the Share page and toggle the Boost button.
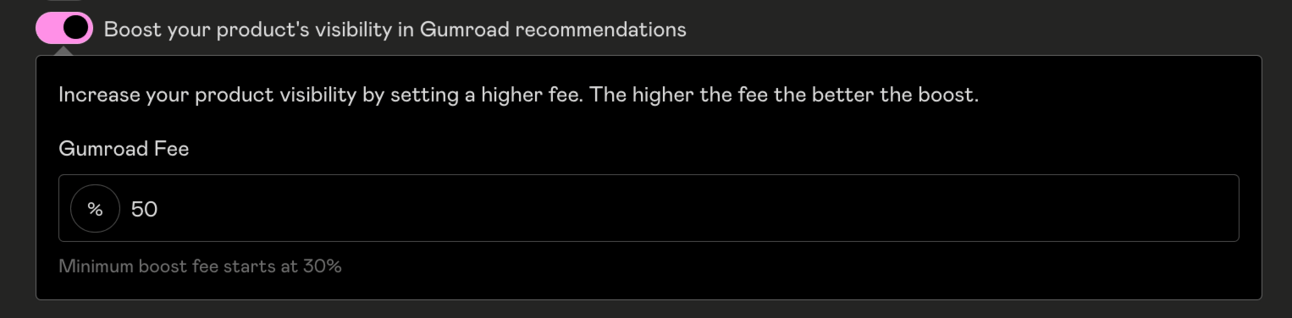
Notice you can also set the percentage you are willing to give Gumroad. This is up to you - the higher the fee the more they will boost.
So if have a $129 product and set fee at 100% Gumroad will take $129 in full. That incentives them to push the product hard. They’ll make it visible and secure sales for you.
Early on I recommend going hard on the fee - I’ll often set it at 100% just to make sales and start to generate reviews. You will make no cash from this of course so it needs to be considered a marketing expense.
Set the boost as high as you can to suit your business goals.
The second element of your launch should be using your social channels and the audience you’ve built up there. Having an existing audience makes gaining initial momentum during a launch much easier.
On social media you should run a campaign over the week or two before launch. Here is a prompt to construct your basic campaign:
Act as a social media marketing expert.

Draft me a series of posts to launch a new product.

The product's name is [name] and it is: [description]

The product contains [components]

It aims to solve these problems: [problem areas]

Create the following social media posts for me
- poll post that primes audience to think about problem areas whilst not mentioning product
- working on something big post
- problem area post and hint at solution coming post
- first announcement post, more details later
- finally ready post, stay tuned for launch tomorrow
- launch post, details of product
- problem area -> benefit 1 post
- problem area -> benefit 2 post
- problem area -> benefit 3 post
- I'm blown away at response post
- have you got your copy, FOMO post
- thank you to community for support in launch post

Make each post under 280 characters. Do not use hashtags. Do not use emojis.
I go ahead and fill in the product name, description, problem areas from previous Parts.
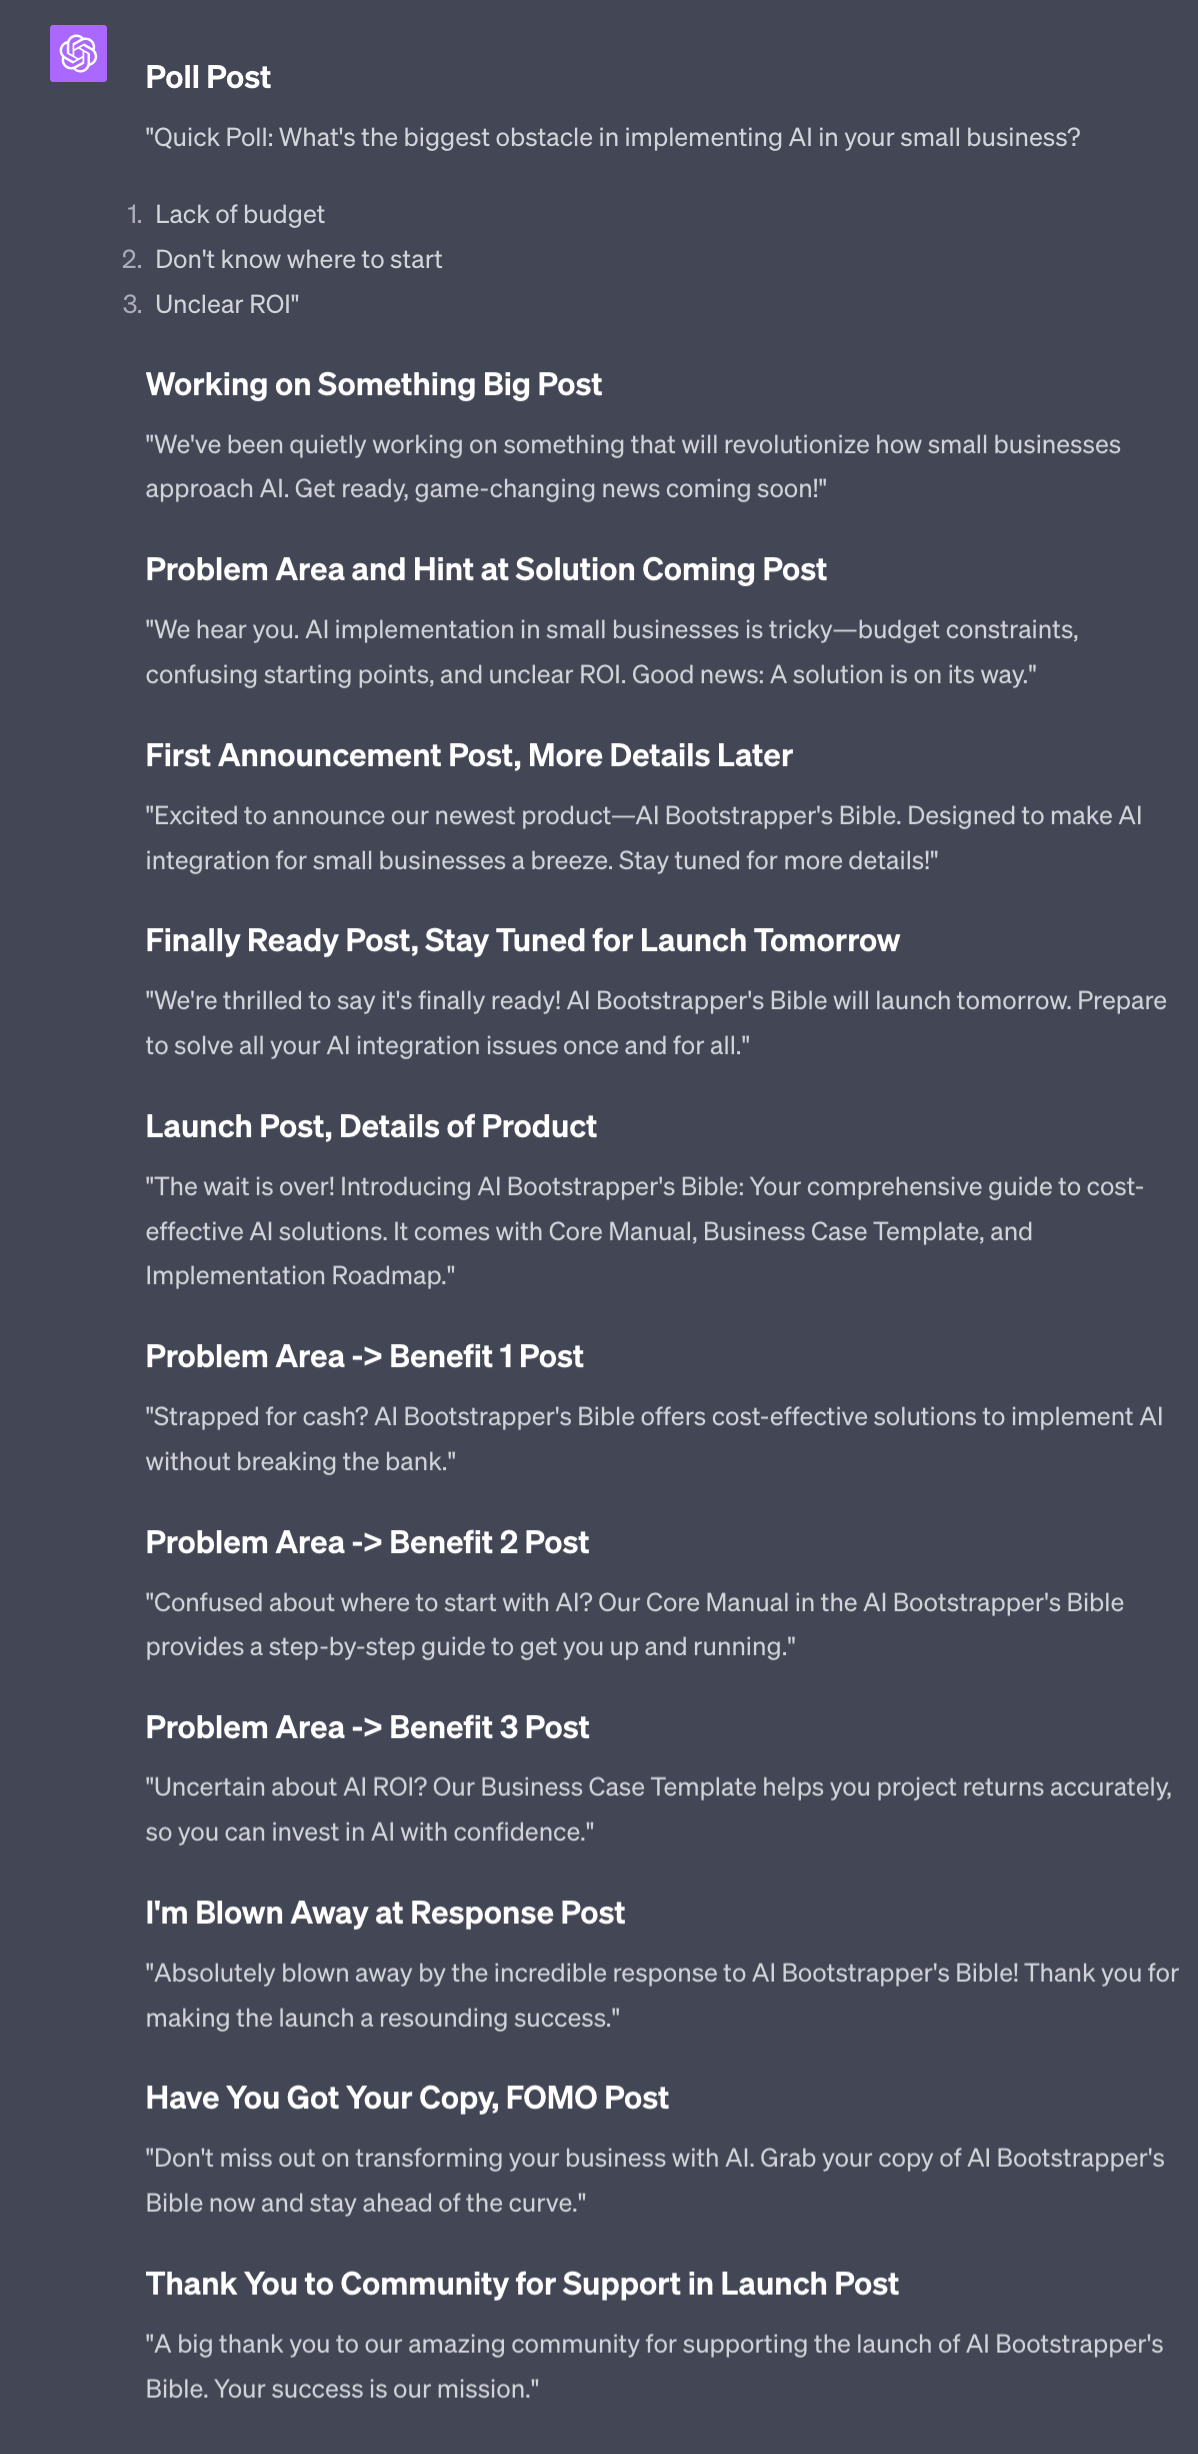
ChatGPT now gives me a whole launch sequence for social media. I’ve crafted these as short Twitter/X messages - you can go longer if using LinkedIn or another platform but I’d recommend short and punchy.
Supplement these posts with your own - perhaps screenshots of the product, personal posts about why this is important to you and early review screenshots. Use your imagination to flesh out the skeleton posts that ChatGPT has given you.
Launching to your Audience on social media is a wide, less focused approach. You may hit a big audience but they are less engaged with you and your work.
If you have a newsletter though this all changes. Your subscribers are your Tribe: people who have actively raised their hand and said “yes please I want to hear more from you.” They did this by first giving you their email address and then by continuing to open the newsletters you send them.
These people are more likely to become customers than those on social media.
Launching to your newsletter is a similar process of teasing, announcing and then reminding people.
But I like to also reward newsletter subscribers more than social media audience. You may have noticed in my newsletter I give away free books every-time I publish a new one. This is a way to say thank you and it boosts my early Amazon sales and reviews. Win-win.
You can do something similar with your Gumroad products by using discount codes.
You can make discount codes in Gumroad by:
Click Checkout
Click New Discount in top right
Filling out the discount details
Set your discount to apply to just the new product. Choose how much of a discount to give your subscribers.
Optionally set a usage limit - this is a nice way to create scarcity. For instance if you have 5000 subscribers you might set a usage limit of 500 first come first served.
This will ensure that people actually bother to claim the discount. Otherwise maybe people will think “ah I’ll just do it later” and will invariably forget.
Once you have a discount set up add a section to an upcoming newsletter with an announcement. Here’s a nice simple prompt:
Act as an expert newsletter writer

Announce a new product and exclusive discount code to the subscribers.

The product is [name] and it is [description]

The normal price is [$] and the discount is [%]

Emphasise limited nature of discount to ensure action
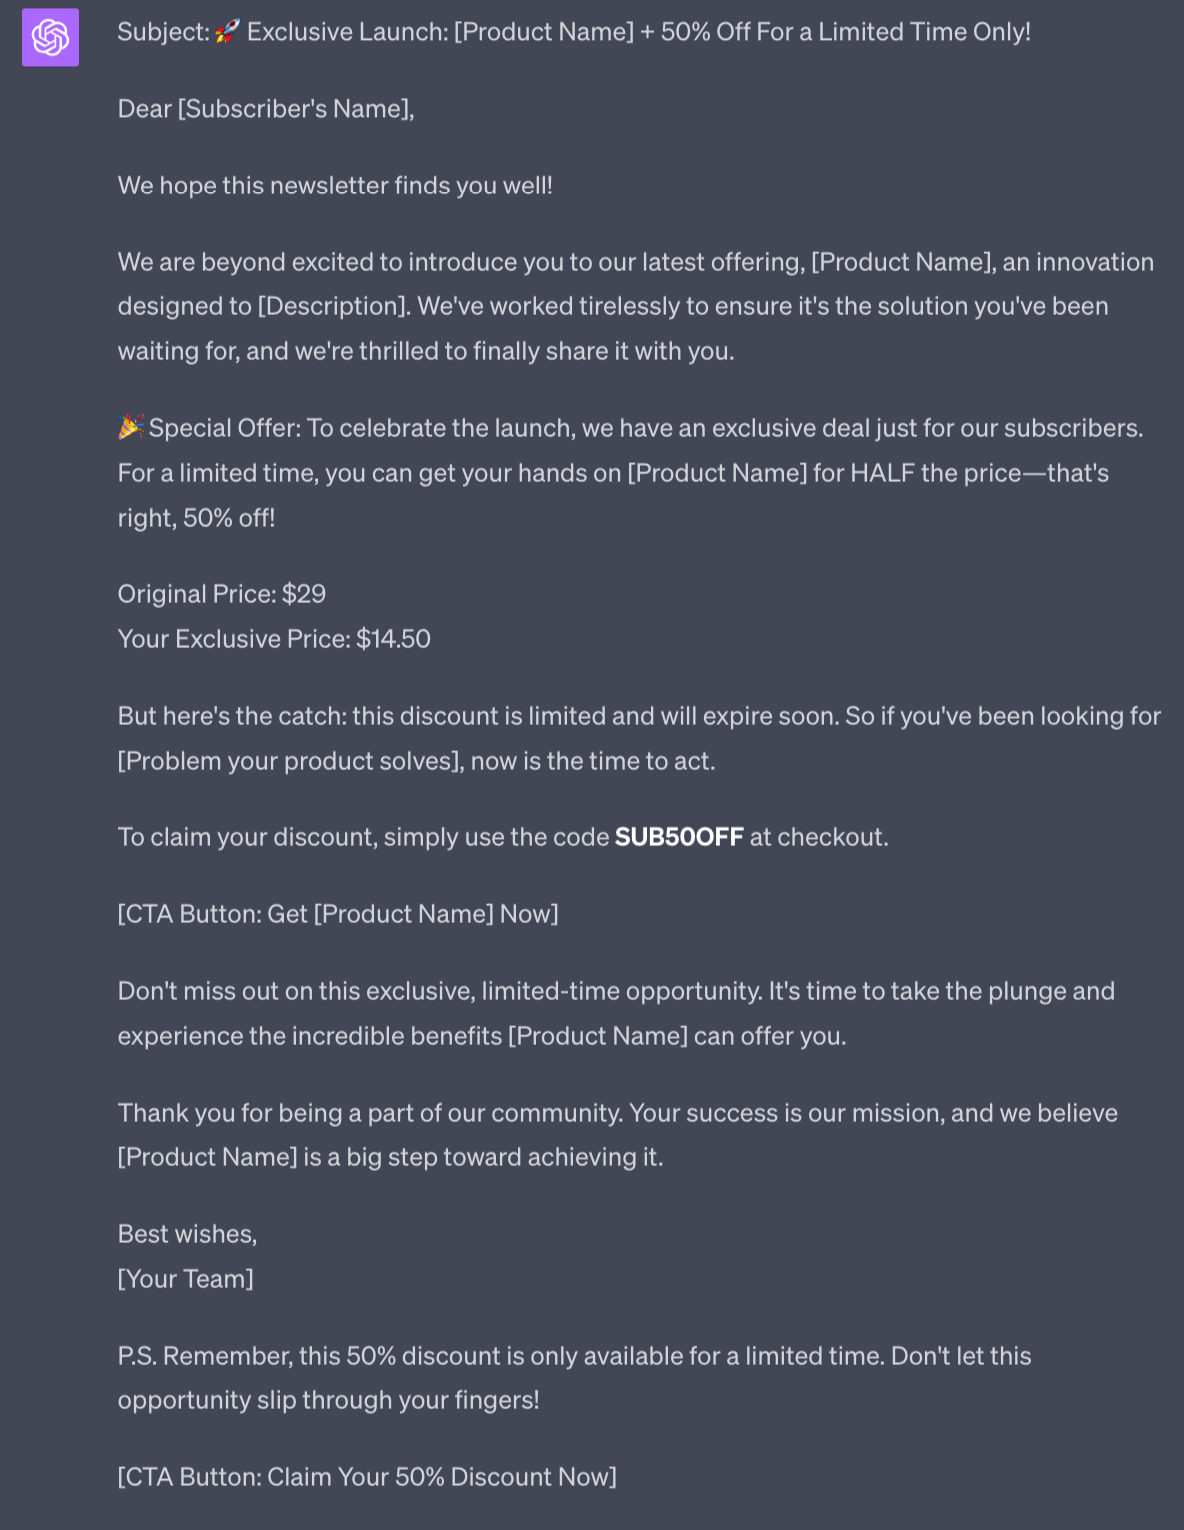
Your announcement could be its own email (like this example) or combined into an existing newsletter - which is better depends on how often you normally contact your subscribers and also how “busy” you standard newsletters are.
As well as launching sales directly to your social media and newsletter lists you should look at running an affiliate campaign in parallel.
Affiliate marketing is basically having other people recommend and help you secure sales and giving them a percentage of the sale.
For example I might charge $200 for a course and offer a 50% affiliate offer.
If someone shares information about my course and drives traffic to my sales page that converts into a sale then I pay them $100 per sale. I collect the remaining $100.
If they send me 10 sales they get $1000 and I get $1000.
Generally affiliate payouts are 30-50% depending on the niche and your relative positions in the marketplace.
If you are brand new in the market then offering a higher affiliate payout like 50% is a good way to get people interested. If you have a long track record of making sales then a lower percentage is normal.
Gumroad has built in affiliate marketing thankfully, making setting this up simple. It is however a little bit hidden.
In the bottom left of the screen you should should your profile pic. Click this and then Affiliates.
Here you can access your affiliate sign up page as well as manually add affiliates.
In both cases we need a source of affiliates!
First stop is definitely pre-existing customers. If they have purchased from you and enjoy your project then see if they want an affiliate link so that they can share products with their friends and also get paid.
Second is your newsletter. Your affiliate programme is a great thing to mention in your newsletter footer or in a P.S.
Third is reaching out toe influencers in your space. This will be the most fruitful strategy because influencers already have large audiences.
The basic idea is to reach out to people who have audiences that would be interested in your offer. Twitter/X is great for this. If you followed the Playbook you’ll have lists of accounts that you engage with - these are the accounts you want to reach out to.
Make sure you first have a relationship with them by engaging in their content and chatting to them on X. Do this in preparation for launching your affiliate campaign.
When you are ready to get them on board send a quick DM like this:
Act as a cold outreach expert.

Write a short Twitter DM to ask if an influencers is interested in promoting my product.

The product is [name] and its about [description]

Mention audience overlap and the product being of interest to their audience.

Mention that the price is [price] and affiliate cut is [%] and give illustrative examples of how 1% conversion from their [follower count] followers would lead to a certain profit.
Plug in the required details, including their follower count.
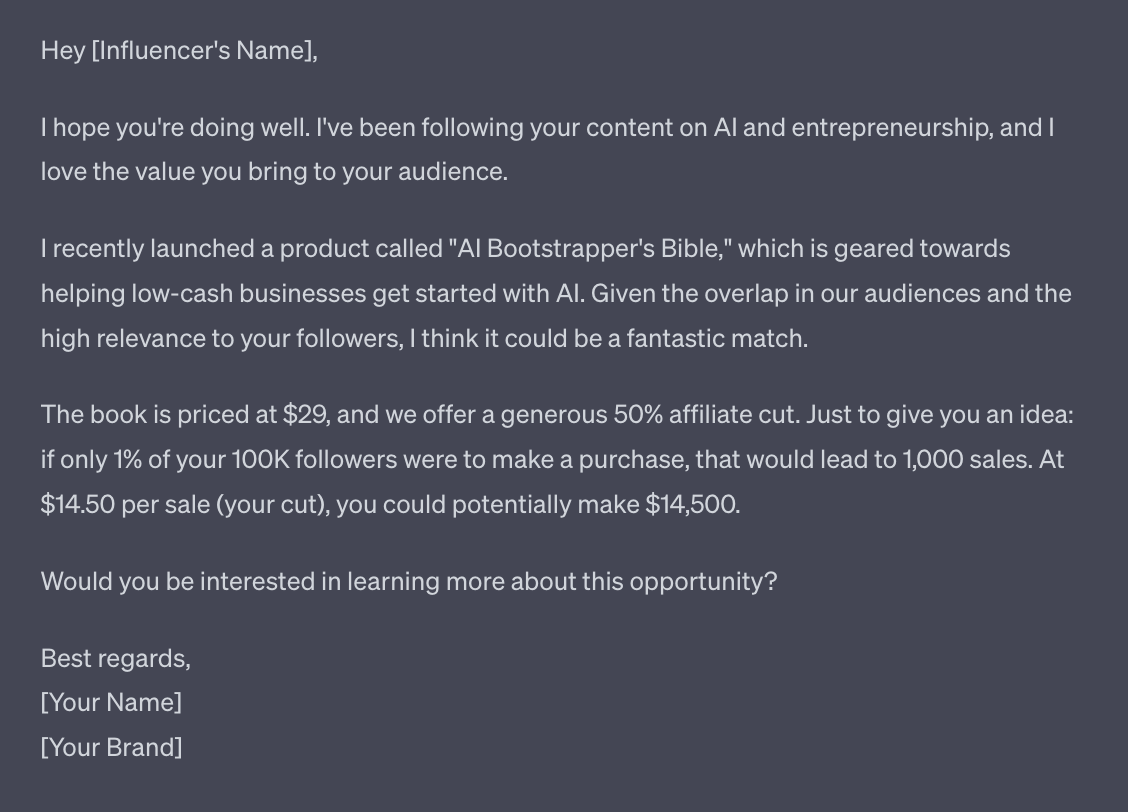
Make sure to adapt this to make it as personal to them and their content as possible. Refer back to previous times you interacted with each other - this is a relationship, not just a transaction.
Subscribe to the Premium Membership to read today’s Premium Prompt.
The strategies outlined above should kickstart your marketing with a solid launch.
Your first launch is always the hardest - remember this.
Once you have customers it’s easy to sell to them again. And prior customers means social proof like reviews. But getting those first customers is a struggle!
These launch plans should help you get over the awkward hump and make your first sale.
When you do, be sure to celebrate. Creating, marketing and selling something yourself is a big deal and a huge milestone in any online business entrepreneur.
In the next Part we’re going to look at how to expand on your successes, automate the process and start to scale your offerings.
A reminder of this week:
Part 1: Plan your digital product
Part 2: Build your digital product
Part 3: Set up shop
Part 4: Market your digital product
Part 5: Expanding your product range
See you tomorrow Prompt Entrepreneur!
Until then, keep PROMPTING!
Kyle
This Part is one of the most important in your digital product journey.
Many make the mistake of launching a single product and leaving it at that.
If it works: happy days, until momentum dies down and sales peeter out.
If it didn’t work: “digital products are rubbish, I’m never doing that again”.
Both bad.
Instead we want to keep launching potential products and doubling down on those that work.
By doing so we start to grow our knowledge, customer base and profitability of each launch.
There are two basic ways we can scale our product offerings.
First we can scale vertically for depth. This is taking our existing products and adding more depth.
We’ve been building up to this by designing tiered products. We can add scale by filling out our tiers.
The price of the product bundle goes up with each tier - allowing us to generate a higher average revenue per sale.
The second way to scale is horizontally for width. This is basically adding more products.
Specifically it’s adding more tier 1 products, rapidly, to see which ones resonate with the audience.
We did audience research early on but product launches will always be a bit unknown. We don't truly know how the audience will react until we launch. They might say they are ready to buy but until people get their credit cards out we don’t know!
Because of this I’ve designed the product launch process so that you can rapidly deploy lots of tier 1 products. In earlier Parts we generated lots of ideas - very likely you had a few that were interesting. Horizontal scaling is building and releasing these products.
We’ll now cover both methods.
This method is releasing more products.
The process here is simple. Just go back to Part 1 of this guide and work through the steps again.
The good news is that this process gets easier and easier each time you did it. First time is always the hardest.
You’ll also have some additional benefits:
You have reviews of your first product. Leverage these in your product description in a “what people said about my other products” section.
We have customers who purchased already. These people will be likely to purchase your second product if it’s the same niche and not too much of an overlap with the first. Set up a Gumroad post to announce the new product to make sure all existing customers know.
The goal here is basically to continue to launch products until you find one that hits.
What’s a hit?
How many sales this is depends on your niche - some niches are just higher volume than others. So I can’t give you a number like 10, 100 or 1000 sales here.
Instead it’s when people start to share your product link around themselves and sales begin to snowball. It’s when it doesn’t feel like you are bleeding and sweating for every last sale. People are raving about it. You know that you’ve created something valuable for the audience.
Once we have a first sale that clicks we can double down and focus on depth by fleshing out the tiers of that successful product.
We should not stop with horizontal scaling though - continue to release new tier 1 products on a sustainable schedule to keep bringing in new customers and maintain momentum.
Vertical scaling is expanding from tier 1 to tier 2 to tier 3 and even beyond.
We already designed a 3 tier version of each product. So we know the rough pathway to follow.
We know complete the remaining steps to complete the components of the tier.
Generally these components will come in other formats - like video. I’ll talk about this shortly.
Remember that the product is still solving the same problems as before.
A lot of the material in further tiers may seem redundant. For example we might have:
a one pager cheatsheet
a checklist
a flowchart
a Notion guide
an eBook
an audiobook
a video course
a piece of software
All focusing on helping people to integrate AI for low cost in their business. All will hit basically the same points, using similar frameworks and systems, just in different formats.
Does this make it less valuable?
Not at all. Because:
People don’t act immediately - if they did we could give them a single sentence on a big problem like losing weight (eat less, only nutritious food, move around more) and they’d go ahead and do it. Humans don’t work like that - we need more handholding.
People learn differently. We all have different preferred formats. Mine is reading. For others it’ll be video. For yet others audio. Converting our product into different formats lets us hit different customers
Multi-format information. Having the product in multiple formats lets customer to access the value in multiple ways.
If in doubt always just think about what will best solve your customers’ problems. That’s the keystone here. They are at A and want to get to B. How do you help them do this?
The above is all well and good but how do you actually go about, for example, creating a video series to add to your course?
Or an infographic? Or a piece of software? Or a chatbot?
Each of these different product outputs could be its own Prompt Playbook. In fact I have produced already!
Regardless of the format the process is basically the same.
First use the same steps to produce the structure and outline of the component. This is the same for eBooks, video courses and even software (GPT-4 can write code for you).
Second you have a choice:
Upskill and create the product yourself. Look for one of my Prompt Playbooks or come ask in the community for signposting.
Outsource the work on Upwork or a similar site.
If you want to continue your learning I’d recommend the first.
If you want to quickly develop and deploy I’d recommend the second.
As a general rule (unless you have the skills) I’d recommend outsourcing coding work as well as high end design work.
And the second is now possible because we are only scaling vertically once money is coming in from the first sale. We reinvest that cash into developing tier 2 and beyond.
Subscribe to the Premium Membership to read today’s Premium Prompt on how to add high-ticket services to our product mix.
Over the course of this Playbook we’ve researched, structured, created, set up shop, launched and expanded our product lines.
More importantly you’ve learned to move fast, release a lot of products, see what sticks and then double down.
We’ve kept the process nice and light to allow you to build and launch at a fast rate until you get a hit.
Once there double down and scale vertically aggressively to supply the demand you’ve just hit upon.
Continue this loop, each time expanding your launches. It will start small and slow but rest assured each time you loop you’ll grow. Each loop you’ll have more knowledge and more resources at your disposal so can have bigger, more profitable launches.
Get this loop working for you and in short-order you’ll have a thriving online product empire working for you.
A reminder of what we’ve covered:
Part 1: Plan your digital product
Part 2: Build your digital product
Part 3: Set up shop
Part 4: Market your digital product
Part 5: Expanding your product range
See you tomorrow Prompt Entrepreneur!
Until then, keep PROMPTING!
Kyle
Unlock the potential of artificial intelligence in product development with our comprehensive playbook, '📦 Building Digital Products with AI | Prompt Playbook.' This guide will take you through the entire journey of creating digital products that not only meet market demands but also resonate with your audience. With practical strategies and actionable insights, you'll learn how to effectively leverage AI tools to streamline your workflow and enhance creativity. Whether you're a seasoned entrepreneur or just starting out, this playbook will equip you with the knowledge to innovate and thrive in the digital landscape.
This playbook is designed for entrepreneurs, freelancers, and business owners who are eager to harness the power of AI in their product development processes. If you find yourself overwhelmed with the complexities of digital product creation or struggling to keep up with market demands, this guide is your solution. It addresses common pain points such as time constraints, resource limitations, and the need for innovative approaches to stand out in a competitive landscape. With our playbook, you'll gain the confidence and skills needed to turn your ideas into successful digital products.
No prior experience is necessary! This playbook is designed to be accessible for beginners while offering valuable insights for those with some knowledge of AI.
Each part is structured to be digestible and can typically be completed in about 1-2 hours, depending on your pace and engagement level.
You'll primarily need access to AI writing tools like ChatGPT and Notion for product structuring and publishing. Additional tools may vary based on your specific product formats.
Absolutely! The principles laid out can be applied to various digital products, including eBooks, templates, and courses, tailored to your niche.
Yes, the strategies discussed are versatile and can be adapted for both business-to-business and business-to-consumer contexts.